> For the complete documentation index, see [llms.txt](https://docs-shpf.bsscommerce.com/b2b-wholesale-solution/llms.txt). Markdown versions of documentation pages are available by appending `.md` to page URLs; this page is available as [Markdown](https://docs-shpf.bsscommerce.com/b2b-wholesale-solution/customer-management/registration-forms/build-a-powerful-wholesale-registration-form.md).
# Build a Powerful Wholesale Registration Form
Create a single-page wholesale registration form in four steps, then add conditional logic, tax ID checks and reCAPTCHA.
{% hint style="warning" %}
**Registration Form Version 1 was deprecated on December 30th, 2025 and is no longer supported.** If your form is still on Version 1, open it and click **Switch to new version editor** to upgrade it to Version 2.
{% endhint %}
Make onboarding B2B customers seamless, professional, and secure — without coding. A wholesale registration form collects business details from new customers, controls how they are approved and tags them so they can see wholesale pricing.
When you save a form, the app creates an Online Store page for it, and every submission appears in the **Applications** tab for approval.
{% hint style="info" %}
A single-page form shows on any page of your storefront. If your store uses Shopify's **new customer accounts** and you want the form inside the customer account after login, use a [multi-step form](/b2b-wholesale-solution/customer-management/registration-forms/set-up-a-multi-step-registration-form.md) instead.
{% endhint %}
## Before you start
1. Go to **B2B customers › Registration Forms**.
2. Make sure the switch next to the **Registration Forms** title is **on**.
3. Turn on the app embed if the **Turn on app embed** button shows under the title (see [Publish Your Wholesale Registration Form to Your Storefront](/b2b-wholesale-solution/customer-management/registration-forms/publish-your-wholesale-registration-form-to-your-storefront.md)).
## Create a form
1. On the **Forms** tab, click **Create form** (on an empty module, use the **Create form** button on the welcome screen).
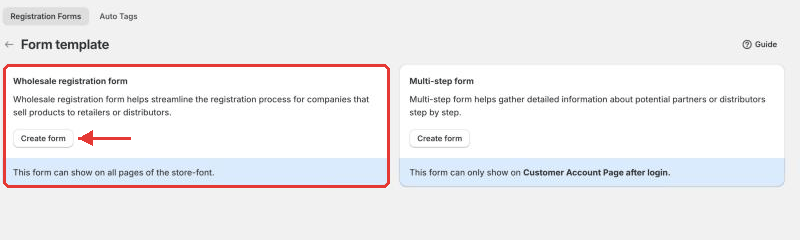
2. Choose the **Wholesale registration form** card and click **Create form**. (The **Multi-step form** card is covered in the [multi-step guide](/b2b-wholesale-solution/customer-management/registration-forms/set-up-a-multi-step-registration-form.md).)
Choose the wholesale registration form template
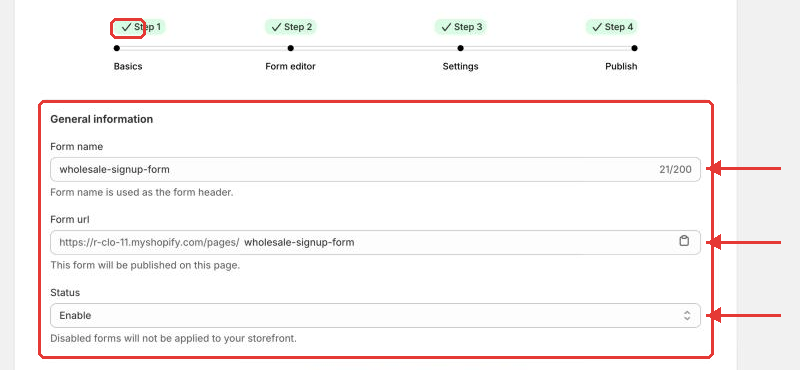
The form editor is a single card with a step bar (there is no side checklist). It has four steps: **Basics → Form editor → Settings → Publish**. Use **Next** at the bottom to move on, or click a step name once it has been reached.
### Step 1: Basics
Basics step
| Field | Options | What it does |
| ------------- | -------------------------- | ----------------------------------------------------------------------------------------------------------------------------------------------------------------------- |
| **Form name** | Text, up to 200 characters | Used as the form header and the page title. Each form needs a unique name. "Default Shopify Form" is reserved. |
| **Form url** | Text | The storefront address is `https://your-store/pages/`. Leave it empty to fill it from the form name. It must not already be used by another page in your store. |
| **Status** | Enable / Disable | Only **Enable**d forms show on your storefront. Disabled forms are not applied to your storefront. |
### Step 2: Form editor
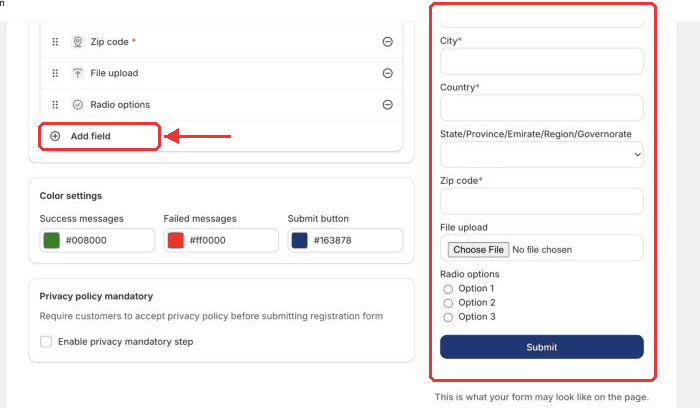
The editor has a **Fields** card and a live **Preview** panel on the side.
Form editor with live preview
* **First name**, **Last name**, **Email** and **Password** are always on the form. First name and Email are always required.
* Click **Add field** to add more, grouped as:
* **System fields:** Address, Address phone, Apartment, City, Company, Country (with an optional State), Phone and Zip code. Each can be added once.
* **Tax ID verification fields:** EU VAT, UK VAT, US EIN, ABN and India GST validation, and **Subscribe to our newsletter**.
* **Custom fields:** Dropdown selection(s), Multiple checkbox, Radio options, Text field, Text area, Heading, Number, Date field and File upload.
* Click a field to edit its **Label text**, **Help text**, **Placeholder**, **Required field** flag and **Field width layout** (30%, 50% or 100%). For **Password** you can set a **Password length** (5 to 40) and require digits, capital letters or special characters.
* Phone and company details are saved to the customer's Shopify profile: the **Phone** value becomes the customer's own phone number, and address, company, city, state, country and zip go to the default address.
* **File upload** fields collect verification documents: up to **10 MB per file**, images up to **25 megapixels**. Common document, spreadsheet, image, zip and MP4 video formats are accepted.
* Under **Color settings**, set the **Success messages**, **Error messages** and **Submit button** colors.
* Under **Privacy policy mandatory**, turn on **Enable privacy mandatory step** so customers must accept your privacy policy text before submitting.
{% hint style="info" %}
A field that is used in conditional logic can't be deleted. The editor shows **Can't delete field**; remove the logic first (see [Conditional logic](#conditional-logic-show-or-hide-fields)).
{% endhint %}
### Step 3: Settings
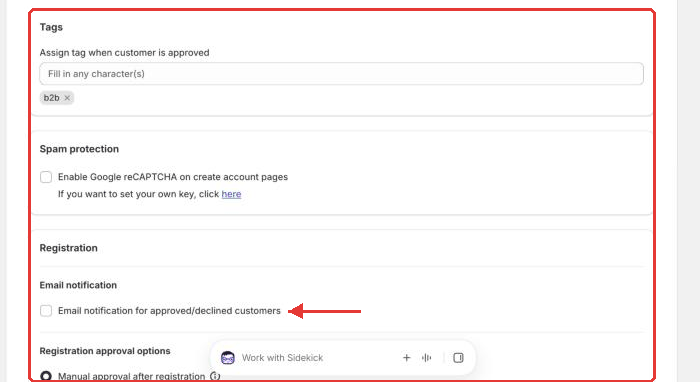
Settings step
| Field | Options | What it does |
| --------------------------------------------------------------------------- | ----------------------------------------------------------------------------------------- | ------------------------------------------------------------------------------------------------------------------------------------------------------------------------------------------------------------------------------------------------------------------- |
| **Tags** – Assign tag when customer is approved | One or more tags | Added to customers approved through this form. Use them for pricing rules and segments. |
| **Spam protection** – Enable Google reCAPTCHA on create account pages | Checkbox | Blocks spam submissions. If Shopify's own spam protection (**Online Store › Preferences**) is also on, turn one off so the form can be submitted. |
| **Email notification** – Email notification for approved/declined customers | Checkbox | Makes approving or rejecting in **Applications** email the customer. Also enable the matching templates in [Email templates](/b2b-wholesale-solution/customer-management/registration-forms/manage-approve-and-notify-your-wholesale-customers.md#email-templates). |
| **Customer approval options** – Manual approval after registration | Radio | Submissions stay **Pending** until you approve them in **Applications**. |
| ↳ Hide password field on the form | Checkbox | Customers create a password after approval (or log in with a one-time code on new customer accounts). Manual approval only. |
| ↳ Auto approve if email contains | Checkbox + text | Auto-approves emails that contain the text you enter (case-sensitive). |
| **Customer approval options** – Auto-approval after registration | Radio | Approves the customer and creates them in Shopify right away. |
| ↳ Allow customers to register with their inactive accounts | Checkbox | Customers with an inactive Shopify account get an activation invitation. Auto-approval only. |
| ↳ Allow existing retail customers to register for wholesale customers | Checkbox | Lets existing retail customers apply. Auto-approval only. Anyone who knows a retail customer's email could request a wholesale account for it. |
| **After registration** | To login page / Custom URL / Clear form, and show messages / Hide form, and show messages | What the shopper sees after submitting. **To login page** is available with auto-approval only. |
| **Taxes** – Auto exempt tax for customers registered with this form | Checkbox | Marks customers from this form as tax exempt. |
{% hint style="warning" %}
Avoid enabling more than one spam filter. The reCAPTCHA of B2B Solution and Shopify's own reCAPTCHA can conflict when both are on. Turn off Shopify's under **Online Store › Preferences › Spam Protection**.
{% endhint %}
### Step 4: Publish
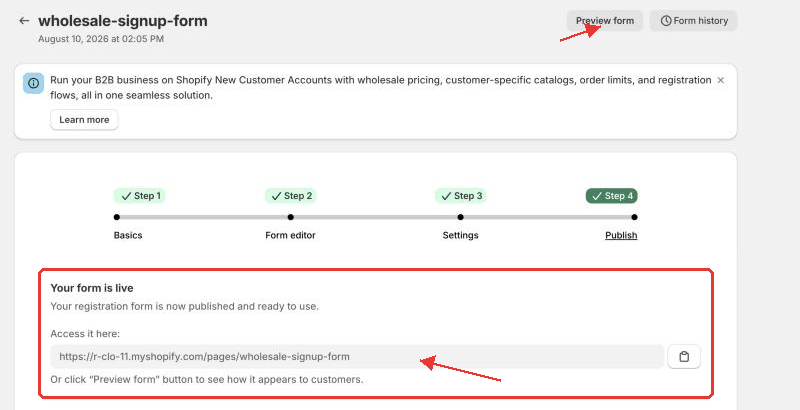
Click **Save**. The **Publish** step shows **Your form is live** with the page link, plus **Option 1: Embed via shortcode** and **Option 2: Add to any page** with the form ID. Click **Preview form** (top right; shown once the form is saved) to see how the form looks to customers. See [Publish Your Wholesale Registration Form to Your Storefront](/b2b-wholesale-solution/customer-management/registration-forms/publish-your-wholesale-registration-form-to-your-storefront.md) for every publishing option.
Publish step
## Manage your forms
On the **Forms** tab each row shows **Name**, **Form type**, **Registrations**, **Pending review**, **Status** (a switch) and **Actions** (the **…** menu). You can turn a form on or off with its **Status** switch. From **Actions** you can:
* **Edit form** – reopen the editor.
* **View form on store** – open the live form.
* **Duplicate form** – copy a form (only version 2 forms and multi-step forms can be duplicated). Conditional logic is **not** copied, so the copy shows every field until you set up logic for it.
* **Go to conditional logic** – jump to that form's logic.
* **Delete form** – removes the form from your store. This can't be undone. If conditional logic uses the form, remove the logic first.
Use **Form history** on the form page to restore an earlier saved version.
## Conditional logic: show or hide fields
Go to **B2B customers › Registration Forms › Conditional logic**. Conditional logic shows or hides form fields depending on how the shopper fills in other fields.
1. Click **Create new logic** (or **Create conditional logic** on an empty page), choose the form in **Choose form to create** and click **Create conditional logic**. Each form can have only one conditional logic.
2. **Step 1: Basics** – confirm the **Conditional form** and set the **Status**.
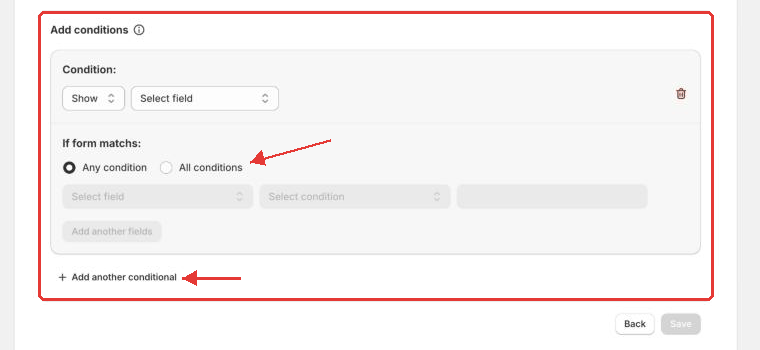
3. **Step 2: Condition logic** – under **Add conditions**, pick **If form matchs:** **Any condition** or **All conditions**, then for each condition choose the **field**, the **condition** (for example **Is**, **Contains**, **Greater than**, **Is selected**) and its value. Use **Add another conditional** for more conditions, and **Add another fields** to choose which fields to show when the conditions match.
4. Save.
Conditional logic editor
{% hint style="info" %}
* All conditions are false if the input is hidden or its value is empty.
* To test whether a checkbox or dropdown option was chosen, use **Contains**.
* First name, last name, email and password can't be shown or hidden. Date and file fields can't be used as a condition.
* The editor checks for duplicate, conflicting and circular conditions before saving.
{% endhint %}
## Tax ID checker
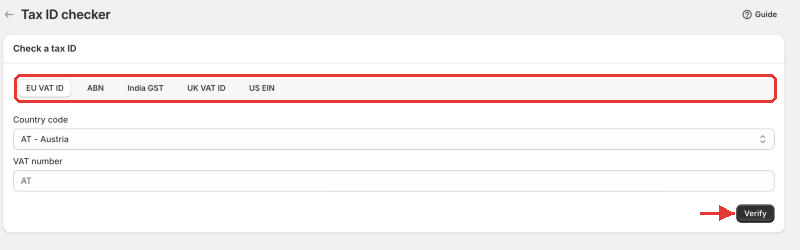
Go to **B2B customers › Registration Forms › More actions › Tax ID checker** to look up a business tax ID yourself. Choose a tab: **EU VAT ID**, **ABN**, **India GST**, **UK VAT ID** or **US EIN**, enter the number and click **Verify**. Each tab keeps a **Checker history** you can review or delete.
Tax ID checker
## reCAPTCHA keys
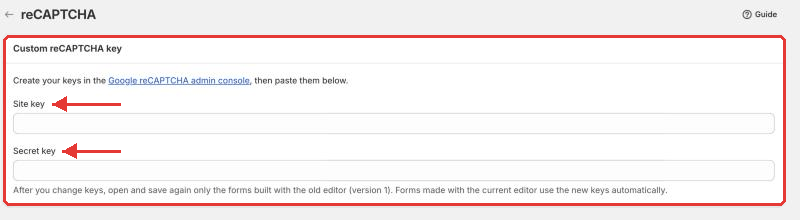
Go to **B2B customers › Registration Forms › More actions › reCAPTCHA** to use your own Google reCAPTCHA keys instead of the app's default ones.
1. Create keys in the **Google reCAPTCHA admin console**.
2. Paste the **Site key** and **Secret key**, then click **Save**.
3. Forms made with the current (version 2) editor use the new keys automatically. Forms still on the old editor (version 1) must be opened and saved again.
Custom reCAPTCHA key
## 💡 Pro tips
* If you're migrating from an older form version, switching to the new editor modifies your form style and can't be undone after saving — contact support if you want help keeping your setup.
* Always test your form yourself before going live to check fields, tags and notifications.
{% hint style="info" %}
If you need further assistance, please feel free to reach us at [**support@bss-b2b.solutions**](mailto:support@bss-b2b.solutions) or [**Live Chat**](https://go.crisp.chat/chat/embed/?website_id=9f64b5a9-1a02-4190-93b8-8ef56b19f740).
{% endhint %}