> For the complete documentation index, see [llms.txt](https://docs-shpf.bsscommerce.com/bss-b2b-quick-order-and-quotes/llms.txt). Markdown versions of documentation pages are available by appending `.md` to page URLs; this page is available as [Markdown](https://docs-shpf.bsscommerce.com/bss-b2b-quick-order-and-quotes/getting-started/quick-start-5-10-mins-setup.md).

# Quick Start (5–10 mins setup)

Get **BSS B2B Quick Order & Quotes** up and running on your storefront in just a few minutes using the 4-step Setup Guide on your dashboard.

This guide walks you through:

* **Step 1**: Enable app embed on your theme
* **Step 2**: Create your first Quick Order page (The guided 3-Step Setup Bar)
* **Step 3**: Set up Reorder
* **Step 4**: Create your first Quote Logic

***

## Step 1: Enable App Embed on Your Theme

Activating the app embed in your Shopify theme is an essential prerequisite for Quick Order, Reorder, and Quote widgets to render properly on your storefront.

1. In the Dashboard Setup Guide, click the action button next to **"Enable app embed"**.
2. The system opens Shopify Theme Editor directly focused on the **BSS B2B Quotes** app embed block.
3. Toggle the **B2B Portal** app embed switch to **ON** in the left sidebar and click **Save** in the top-right corner.
4. Return to your app dashboard. The system automatically inspects your live published theme, verifies the embed status, and automatically checks off Step 1 as completed.

<figure><img src="https://165668525-files.gitbook.io/~/files/v0/b/gitbook-x-prod.appspot.com/o/spaces%2F6BtZ1bmXof30clbYP14n%2Fuploads%2Fgit-blob-9fe3a38a9ac75592382b00761f410006506cf408%2Fquick_start_enable_app_embed.png?alt=media" alt="Turn on the B2B Portal app embed and click Save"><figcaption><p>Turn on the <strong>B2B Portal</strong> app embed and click <strong>Save</strong></p></figcaption></figure>

***

## Step 2: Create a Quick Order Page

{% hint style="warning" %}
Skip this step if your store only requires the **Request for Quote** feature.
{% endhint %}

Our guided **3-Step Setup Bar** walks you through creating a high-converting bulk order page with zero guesswork:

```mermaid
flowchart LR
    TMP["Choose a Template\n(Scratch or Wholesale)"] -->|Continue| S1["Step 1\nChoose customer type"]
    S1 -->|Next| S2["Step 2\nSet up Quick Order visibility"]
    S2 -->|Next| S3["Step 3\nCustomize Quick Order page\n(Customizer Workspace)"]
    S3 -->|Save| PUB["Publish Window\nPage title & Page URL handle"]
```

### 2.1. Start Page Creation

1. In the app navigation, click **Quick Order** → **Pages**.
2. Click **Create new page**.
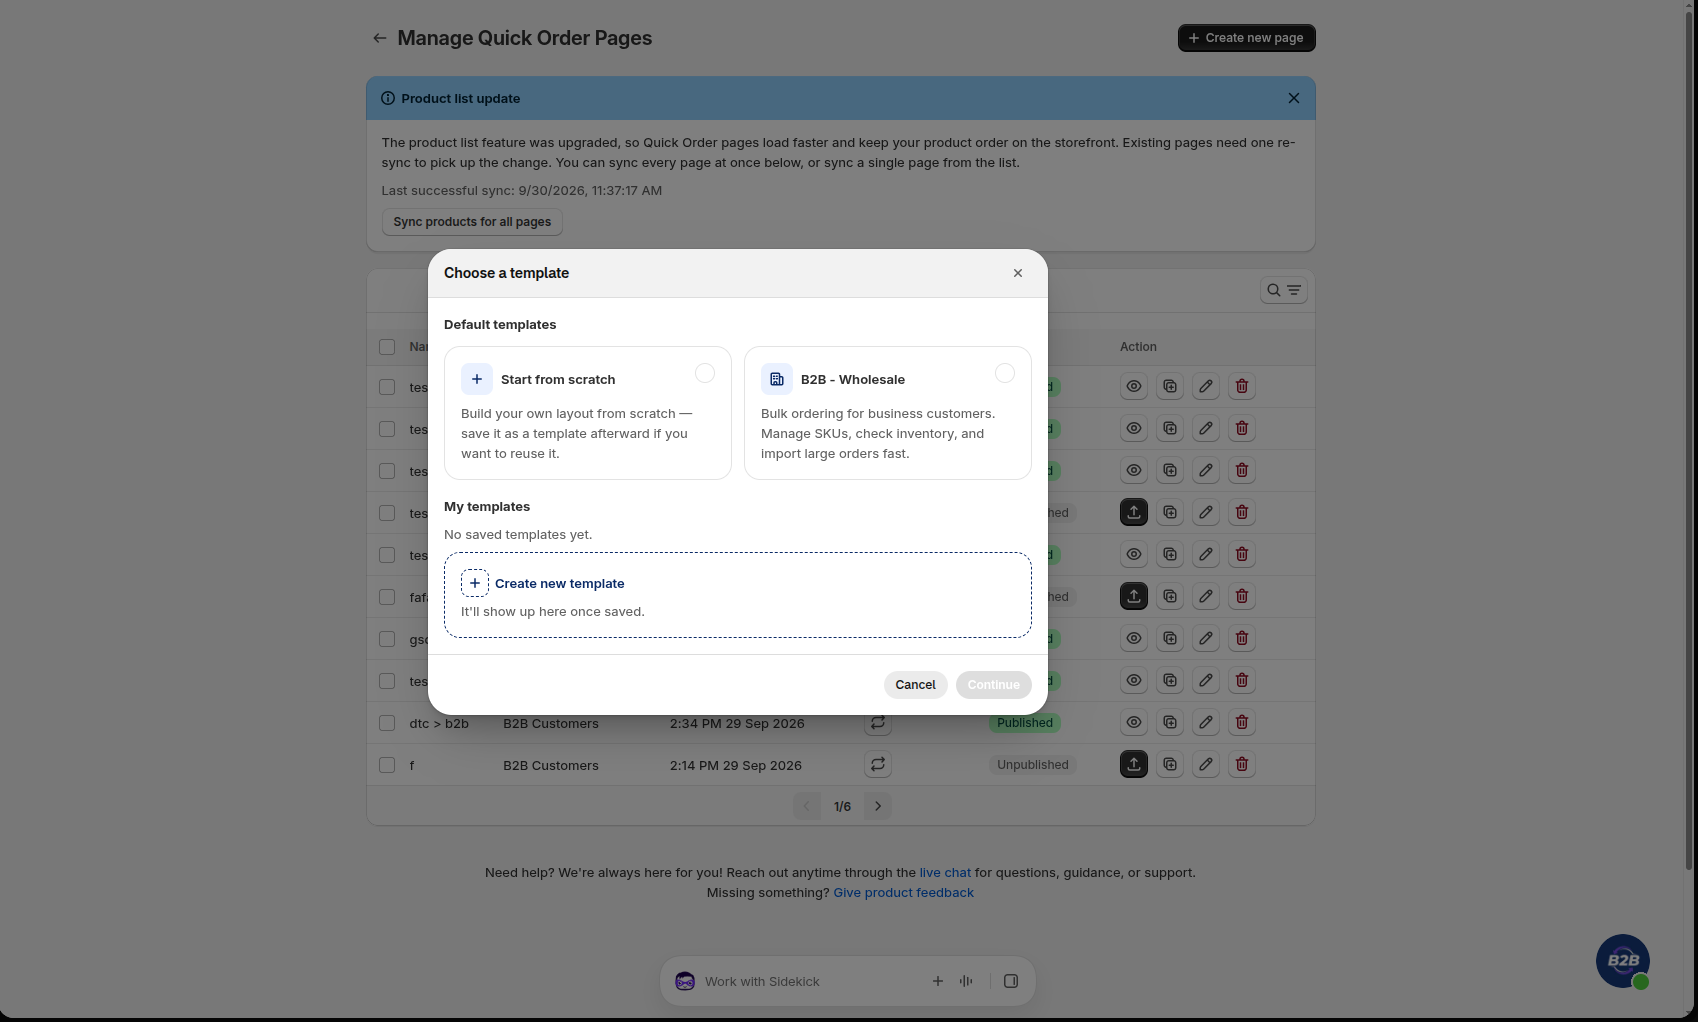
3. In the **"Choose a template"** window, choose a starting point:
   * **Start from scratch**: Build your custom layout from the ground up (you can save it as a template later if you want to reuse it).
   * **B2B - Wholesale**: A pre-configured layout optimized for high-volume corporate buyers, featuring SKU displays, stock levels, and instant CSV imports.
   * **My templates**: Reusable custom layouts previously saved for your store.
4. Click **Continue** to start Step 1.

<figure><img src="https://165668525-files.gitbook.io/~/files/v0/b/gitbook-x-prod.appspot.com/o/spaces%2F6BtZ1bmXof30clbYP14n%2Fuploads%2Fgit-blob-b51f2d452b8de30b6db318ad5292f1e390be5c1e%2Fquick_order_choose_template_modal.png?alt=media" alt="Choose a template window"><figcaption><p>Choose a template window</p></figcaption></figure>

### 2.2. Step 1: Choose Customer Type & Name

1. **Customer Type ("Who are you creating this Quick Order page for?")**:
   * **Default Customers**: Standard storefront visitors, retail customers, or tagged wholesale buyers.
   * **Company Customers**: Wholesale accounts driven by B2B Catalogs (via B2B Markets on any Shopify plan, or Company Locations on Shopify Plus; requires app Enterprise Plan).
2. **General Information (`Name`)**: Enter an internal administrative name (e.g., *Wholesale Quick Order*). This field is required; if left blank, clicking **Next** highlights the field and displays `"Name is required"` before proceeding.
3. Click **Next**.

<figure><img src="https://165668525-files.gitbook.io/~/files/v0/b/gitbook-x-prod.appspot.com/o/spaces%2F6BtZ1bmXof30clbYP14n%2Fuploads%2Fgit-blob-b923f026883261f37a644c2420f7ac5b2c7eb346%2Fquick_order_step1_customer_type.png?alt=media" alt="Step 1: Choose customer type &#x26; Name"><figcaption><p>Step 1: Choose customer type &#x26; Name</p></figcaption></figure>

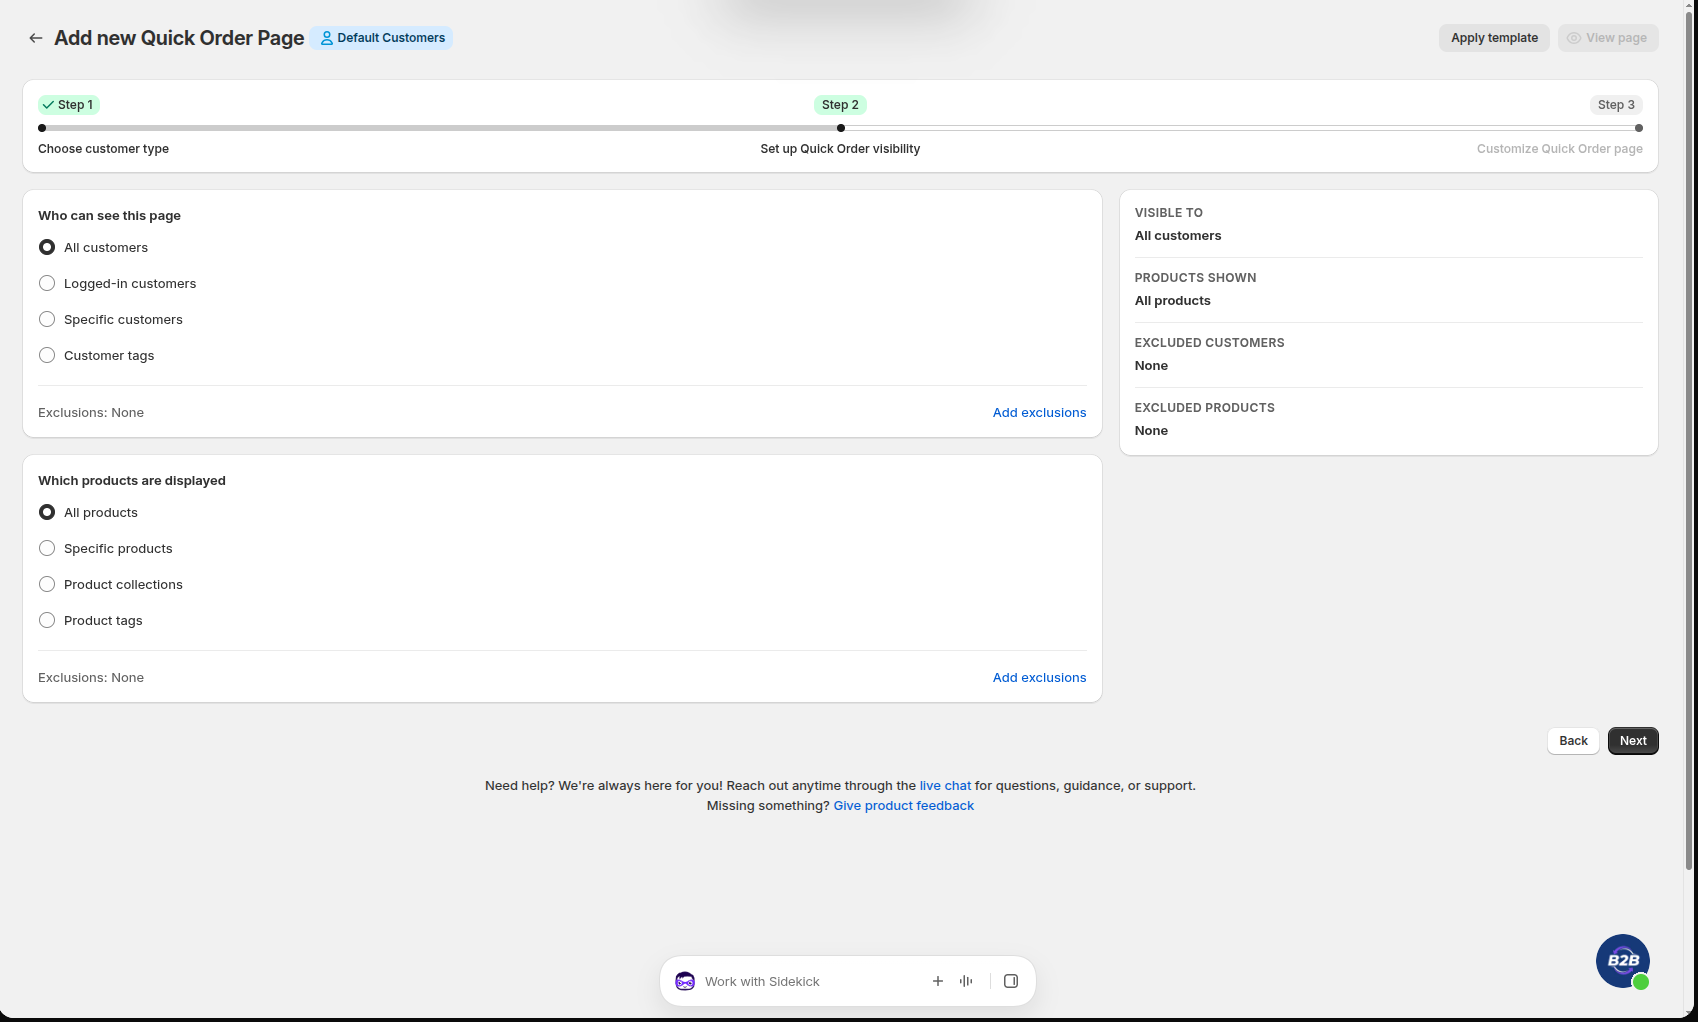
### 2.3. Step 2: Set Up Quick Order Visibility

Control who sees the page and which catalog products are included:

1. **Customer Access ("Who can see this page")**: Choose *All customers*, *Logged-in customers*, or select *Specific customers* or *Customer tags*.
   * *(Default Customers only)* You can also configure **Exclude customers** to prevent specific accounts or tags from viewing the page.
2. **Product Scope ("Which products are displayed")**: Choose *All products*, *Specific products*, *Product collections*, or *Product tags*.
   * If you choose collections, selecting a single collection preserves your manual **Collection order**.
3. **Product Order Preview**: Check the live 5-item preview table at the bottom to verify the items and sort order.
4. Click **Next**.

<figure><img src="https://165668525-files.gitbook.io/~/files/v0/b/gitbook-x-prod.appspot.com/o/spaces%2F6BtZ1bmXof30clbYP14n%2Fuploads%2Fgit-blob-ef0ba4aabf21907266f232fde222677e084d06b7%2Fquick_order_step2_visibility.png?alt=media" alt="Step 2: Set up Quick Order visibility"><figcaption><p>Step 2: Set up Quick Order visibility</p></figcaption></figure>

### 2.4. Step 3: Customize Storefront Design

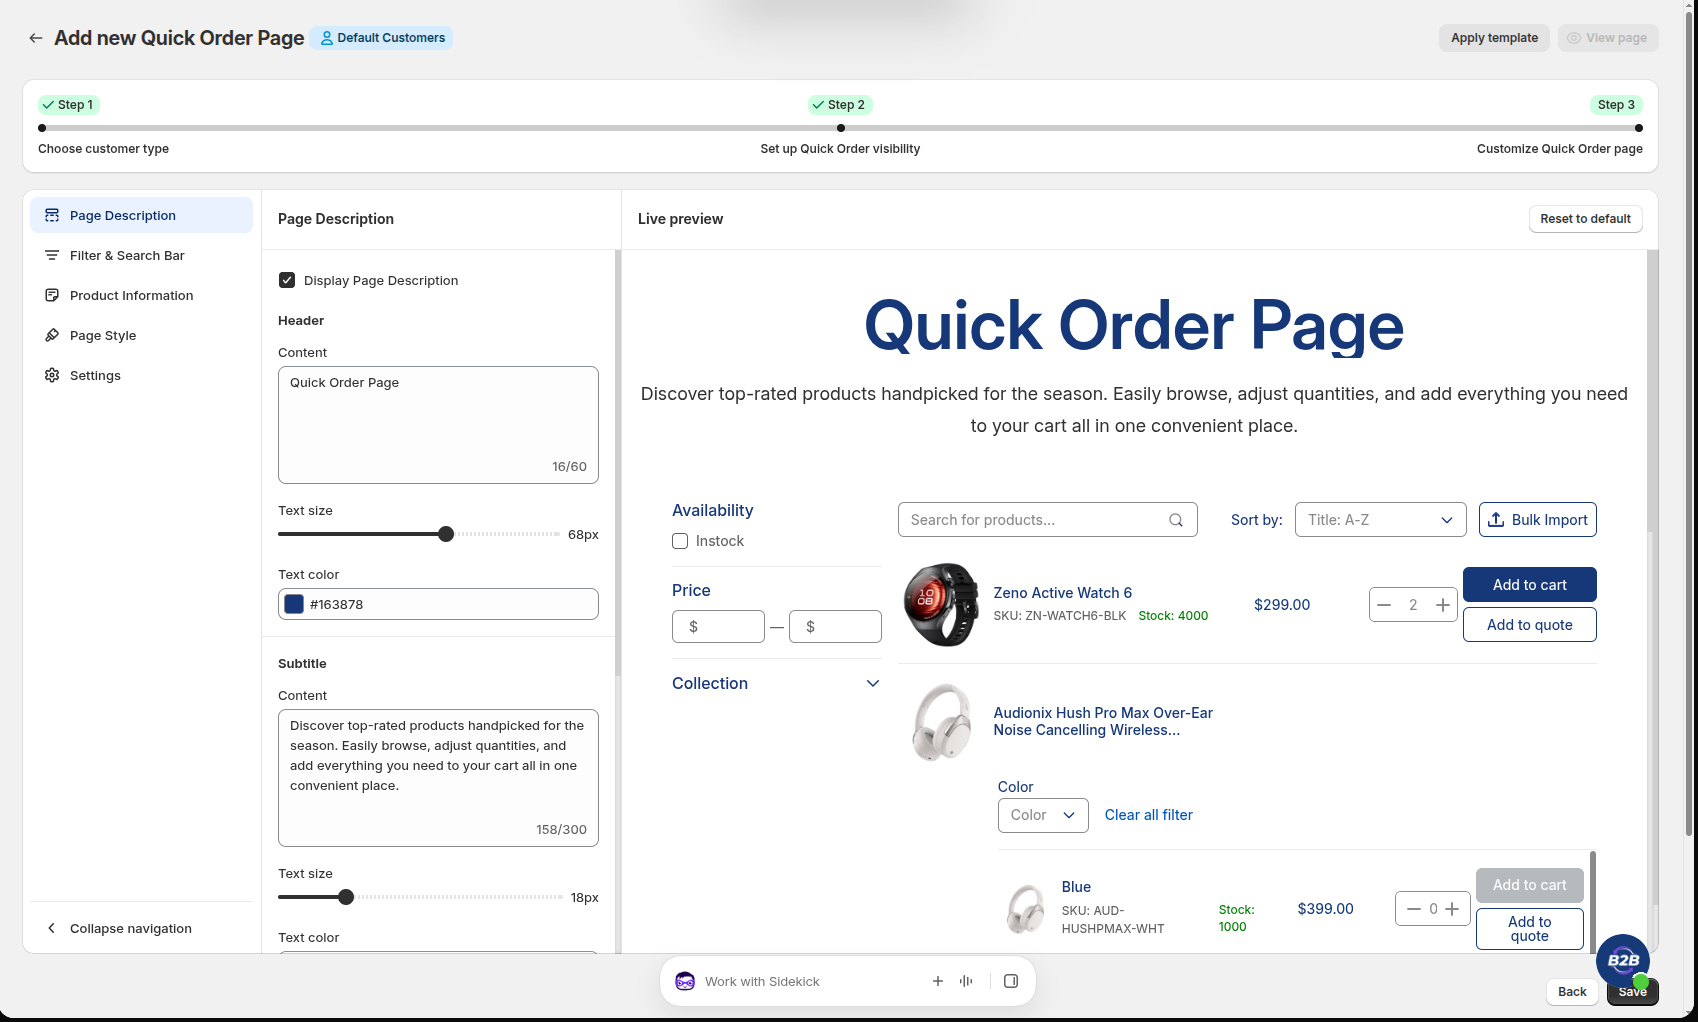
Step 3 opens your interactive **Storefront Customizer**:

* **Left Navigation Menu**: Easily toggle between the 5 configuration sections:
  1. *Page Description*: Add a header title (max 60 characters), guidance subtitle (max 300 characters), banner image URL, and up to 4 custom links.
  2. *Filter & Search Bar*: Toggle the search bar, sort options, bulk CSV import, and facet filters (Availability, Price range, Collections).
  3. *Product Information*: Select visible columns (SKU, Type, Vendor, Inventory stock level, Discount badge) and manage Metafields.
  4. *Page Style*: Fine-tune button colors (Add to Cart / Add to Quote) and adjust Corner radius and Border width.
  5. *Settings*: Select Variant Display Mode (*Show all variants in a list* vs. *Show variants in a pop-up*) and toggle R4Q Quote buttons.
* **Right Interactive Live Preview**: Preview changes in real time with dynamic responsive rendering and use the **Reset to default** button if you want to restore baseline styles.

<figure><img src="https://165668525-files.gitbook.io/~/files/v0/b/gitbook-x-prod.appspot.com/o/spaces%2F6BtZ1bmXof30clbYP14n%2Fuploads%2Fgit-blob-776dcfdf78e4090b5dea592aad37873813797189%2Fquick_order_step3_customizer_overview.png?alt=media" alt="Step 3: Customize Quick Order page"><figcaption><p>Step 3: Customize Quick Order page</p></figcaption></figure>

### 2.5. Save & Publish Your Page

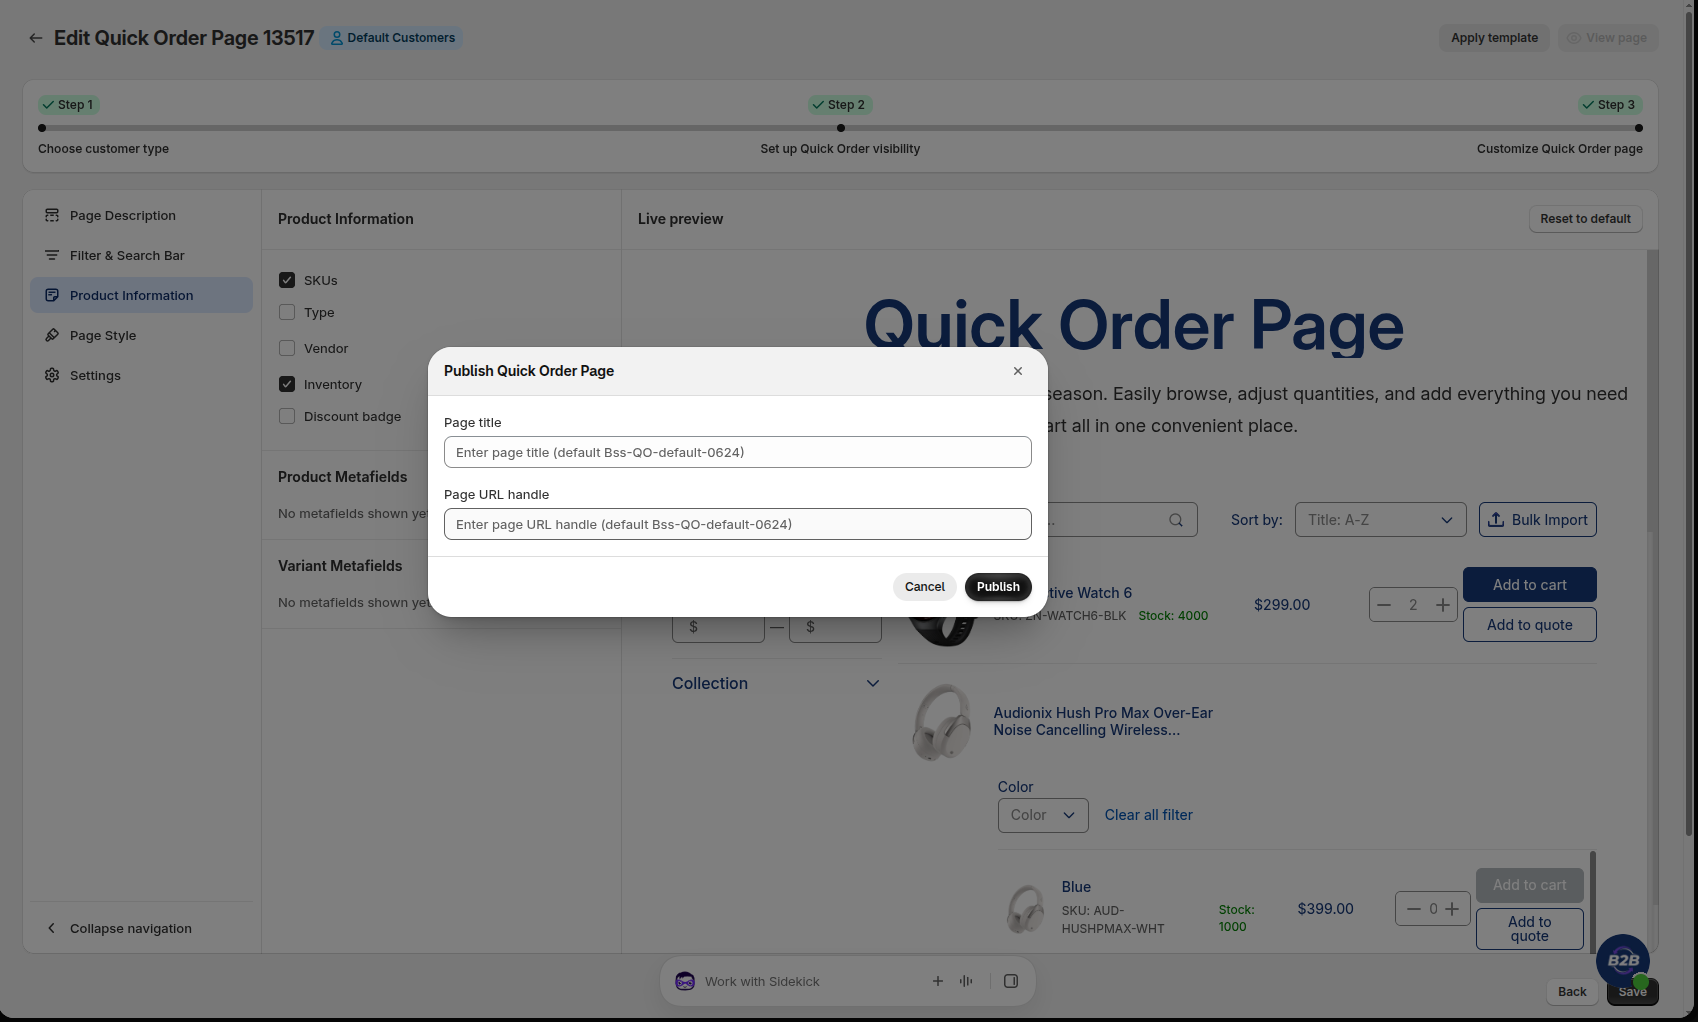
1. When configuration in Step 3 is complete, click **Save** in the top bar.
2. In the **"Publish Quick Order Page"** modal that appears:
   * Confirm the **Page title** (what customers see in their browser tab).
   * Confirm the **Page URL handle** (e.g., `/pages/wholesale-order`).
3. Click **Publish**.
4. Click **View page** to see your live Quick Order page on your storefront! 🚀

<figure><img src="https://165668525-files.gitbook.io/~/files/v0/b/gitbook-x-prod.appspot.com/o/spaces%2F6BtZ1bmXof30clbYP14n%2Fuploads%2Fgit-blob-2584033df927647af5b73e935830b4ce30526e0c%2Fquick_order_publish_modal.png?alt=media" alt="Publish Quick Order Page window"><figcaption><p>Publish Quick Order Page window</p></figcaption></figure>

***

## Step 3: Set Up Reorder (Repeat Orders)

Allow your existing B2B buyers to repeat previous orders or pending draft orders with a single click:

1. In the app navigation, click **Reorder**.
2. Review customer eligibility in **Settings** (All logged-in customers or specific buyer tags).
3. Confirm your order tabs are active:
   * **Orders**: Repurchase items directly from past order history.
   * **Waiting for Checkout**: Instant checkout for merchant-sent draft orders.
4. Click **Publish** to make the Reorder portal live at `/pages/reorder`.

* *For complete configuration, see the* [*Reorder Full Setup Guide*](/bss-b2b-quick-order-and-quotes/reorder/full-setup-guide.md)*.*

***

## Step 4: Create Quote Logic (Request for Quote)

{% hint style="success" %}
**Note:** You can follow this quick guide or refer to the [Request for Quote Full Setup Guide](/bss-b2b-quick-order-and-quotes/request-for-quote/full-setup-guide.md) for a comprehensive walkthrough.
{% endhint %}

{% hint style="warning" %}
**Note:** If you only want to use the **Request for Quote** module without complex conditional rules, you can use the default global settings.
{% endhint %}

#### 4.1. Open The Quote Logic Configuration

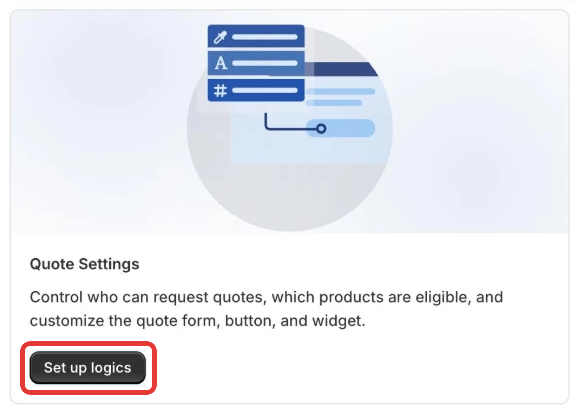
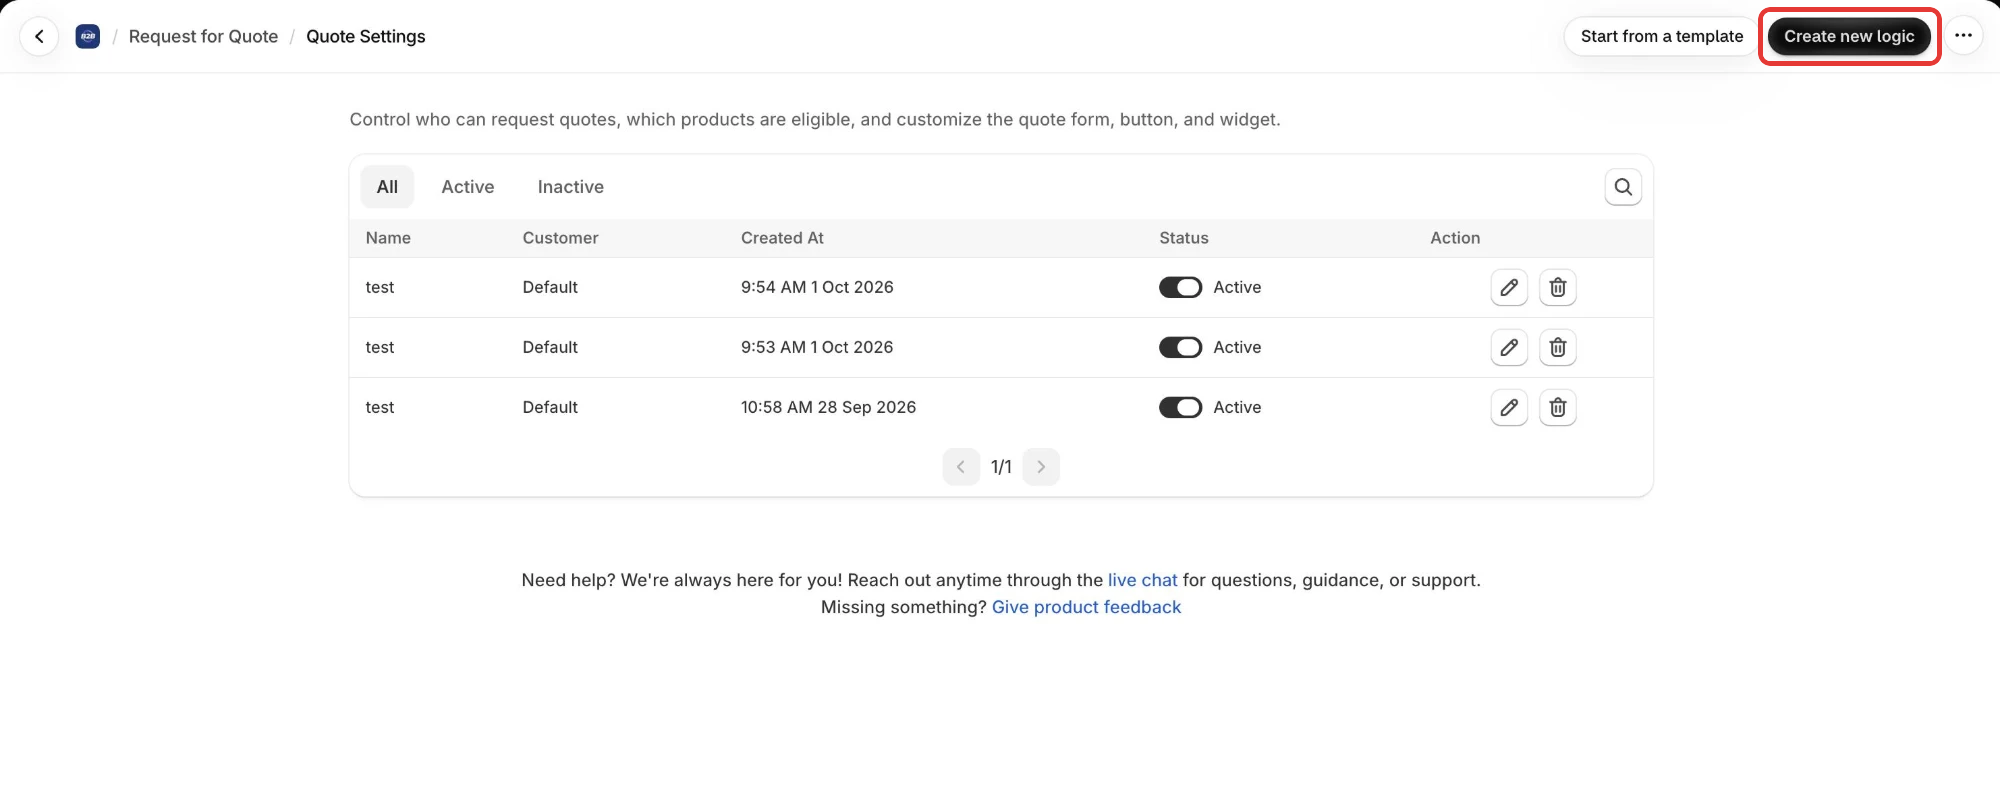
Click **Request for Quote** in the navigation bar. In the **Quote Settings** card, click **Set up logics** → then click **Create new logic**.

<figure><img src="https://165668525-files.gitbook.io/~/files/v0/b/gitbook-x-prod.appspot.com/o/spaces%2F6BtZ1bmXof30clbYP14n%2Fuploads%2Fgit-blob-77ca6e71bb505dbd17a7c1cb42a51280d903d78b%2Frfq_quote_settings_set_up_logics.png?alt=media" alt="Click Set up logics"><figcaption><p>Click <strong>Set up logics</strong></p></figcaption></figure>

<figure><img src="https://165668525-files.gitbook.io/~/files/v0/b/gitbook-x-prod.appspot.com/o/spaces%2F6BtZ1bmXof30clbYP14n%2Fuploads%2Fgit-blob-3bbd561aaedf2ebac8beec70109d70948090951b%2Frfq_quote_settings_create_new_logic.png?alt=media" alt="Click Create new logic"><figcaption><p>Click <strong>Create new logic</strong></p></figcaption></figure>

#### 4.2. Choose Customer Type

After clicking **Create new logic**, the **"Who are you creating Quote Logic for?"** window appears. Choose who this quote logic is for, then click **Create logic**:

* **Default Customers**: Your standard storefront customers.
* **Company Customers**: B2B company customers (requires the app's **Enterprise** plan).

<figure><img src="https://165668525-files.gitbook.io/~/files/v0/b/gitbook-x-prod.appspot.com/o/spaces%2F6BtZ1bmXof30clbYP14n%2Fuploads%2Fgit-blob-19e02b95a2a68b4ed113840952b93afba4a975ba%2Frfq_create_logic_customer_type_modal.png?alt=media" alt="Choose customer type, then click Create logic"><figcaption><p>Choose customer type, then click <strong>Create logic</strong></p></figcaption></figure>

{% hint style="warning" %}
If your store is not on the **Enterprise** plan, the **Company Customers** option is unavailable and the logic is created for **Default Customers**.
{% endhint %}

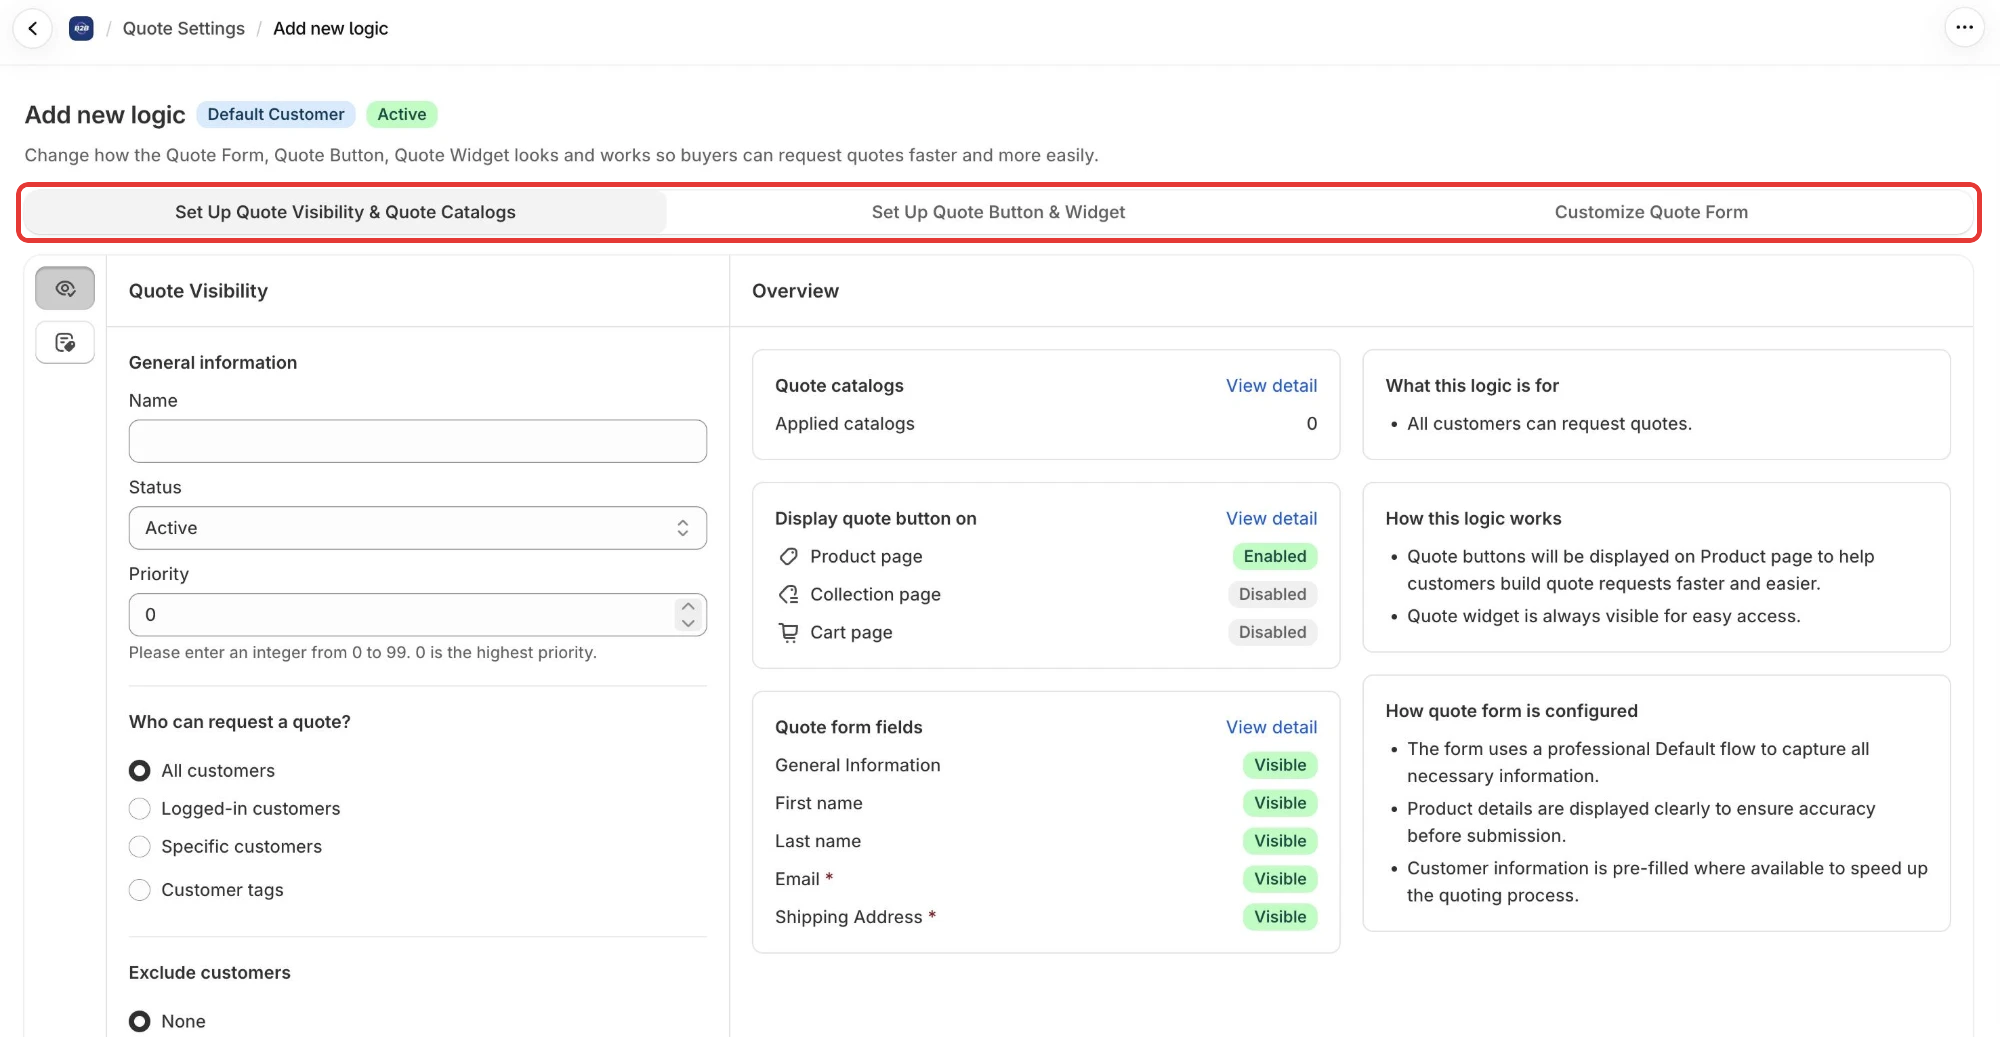
Once selected, you’ll enter the Quote Logic configuration page with **3 tabs** at the top:

* **Set Up Quote Visibility & Quote Catalogs**
* **Set Up Quote Button & Widget**
* **Customize Quote Form**

<figure><img src="https://165668525-files.gitbook.io/~/files/v0/b/gitbook-x-prod.appspot.com/o/spaces%2F6BtZ1bmXof30clbYP14n%2Fuploads%2Fgit-blob-3e0227cac2ac88017696763a74142931c922a79c%2Frfq_add_new_logic_tabs.png?alt=media" alt="The 3 setup tabs"><figcaption><p>The 3 setup tabs</p></figcaption></figure>

You'll start with the first tab: **Set Up Quote Visibility & Quote Catalogs**.

#### 4.3. Set Up Quote Visibility & Quote Catalogs

In this tab: You must enter a **name** for your quote logic, (Optional) Set a **priority,** Choose which **customers** will see the quote form, Select **products** where the quote button and form will be shown.

Click the next tab: **Set Up Quote Button & Widget**.

#### 4.4. Set Up Quote Button & Widget

In this tab: You must choose whether to **show or hide prices,** Customize the appearance of the **quote button** (text, color, etc.).

Click the next tab: **Customize Quote Form**.

#### 4.5. Customize Quote Form

In this tab: You can show or hide **product information** on the form. Add, edit, or remove **form fields,** customize the **form design** to match your brand.

Once everything is set up, click **“Save”** at the top of the page to save and activate your quote logic.

#### 4.6. Preview Your Store

Open your storefront and test the quote form! Try submitting a quote request to confirm it appears in your **Quote Submission List**.

{% hint style="warning" %}
***Note:*** We may need to add some code snippets on your Shopify theme to enable the quote button.

If you don’t see the quote form or button on your storefront, please **contact our support team** and we’ll help integrate it with your theme.
{% endhint %}