> For the complete documentation index, see [llms.txt](https://docs-shpf.bsscommerce.com/bss-b2b-quick-order-and-quotes/llms.txt). Markdown versions of documentation pages are available by appending `.md` to page URLs; this page is available as [Markdown](https://docs-shpf.bsscommerce.com/bss-b2b-quick-order-and-quotes/quick-order/create-quick-order-page.md).

# Create Quick Order Page

This guide walks you through building and configuring high-converting Quick Order pages for your store using our guided **3-Step Setup Bar** and interactive **Storefront Customizer**. Whether you need a streamlined replenishment portal for retail buyers or a private wholesale catalog for negotiated B2B accounts, follow these steps to build and launch your page in minutes.

***

## 1. How Page Setup Works (The 3-Step Setup Bar)

In your Shopify Admin, open **BSS B2B Quotes > Quick Order**:

1. Click **Create new page**.
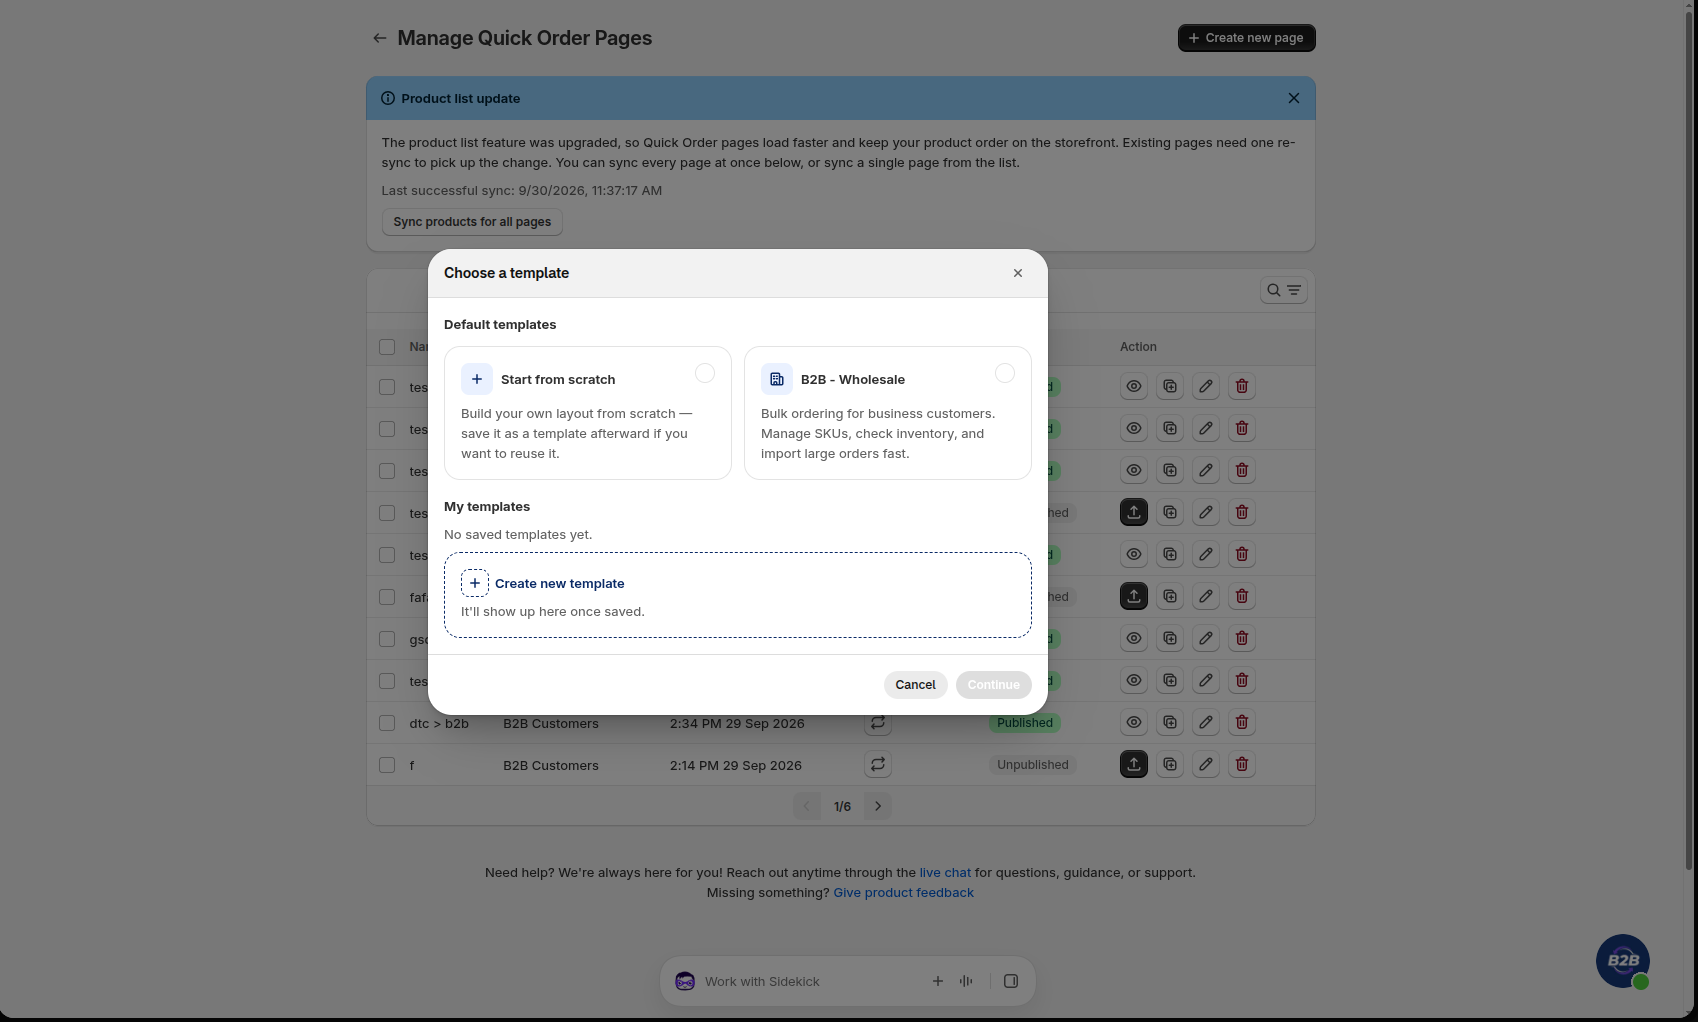
2. The **"Choose a template"** window appears. Choose a starting point:
   * **Start from scratch**: Build your custom layout from the ground up (you can save it as a template later if you want to reuse it).
   * **B2B - Wholesale**: A pre-configured layout optimized for high-volume corporate buyers, featuring SKU displays, stock levels, and instant CSV imports.
   * **My templates**: Reusable custom layouts previously saved for your store.
3. Click **Continue** to launch the guided **3-Step Setup Bar**:
   * **Step 1: Choose customer type**
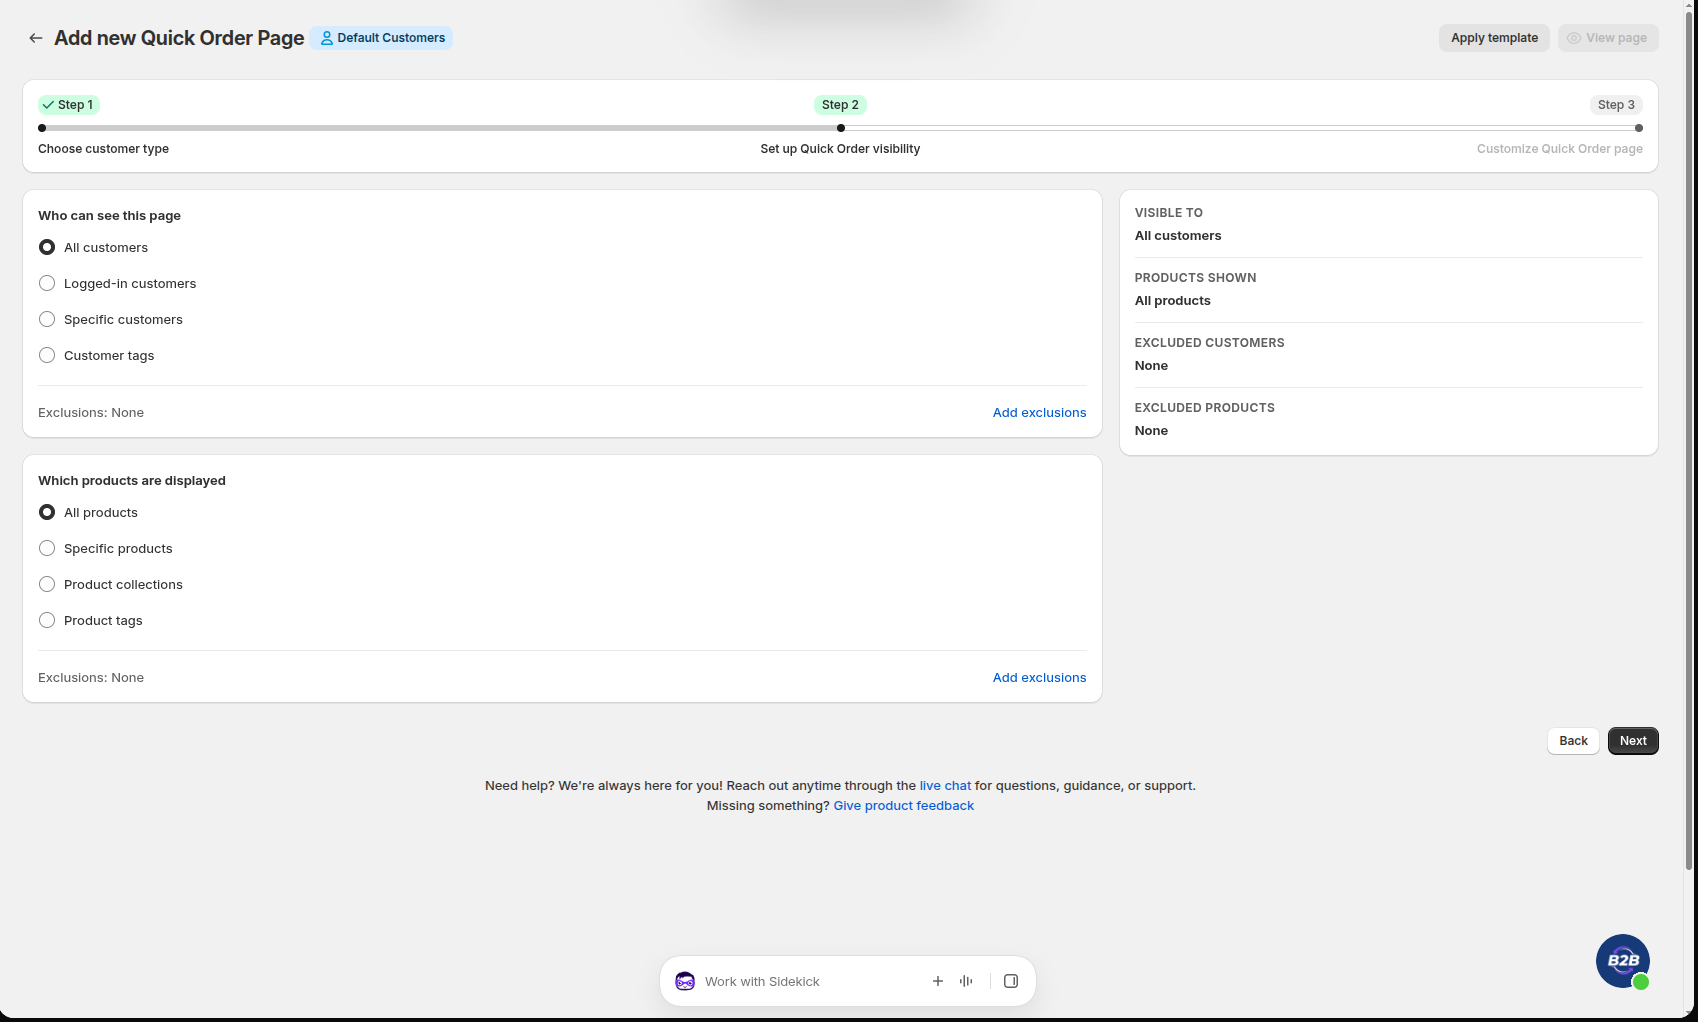
   * **Step 2: Set up Quick Order visibility**
   * **Step 3: Customize Quick Order page**

<figure><img src="https://165668525-files.gitbook.io/~/files/v0/b/gitbook-x-prod.appspot.com/o/spaces%2F6BtZ1bmXof30clbYP14n%2Fuploads%2Fgit-blob-806e4c47cf78d7d4e0693d5ed62c23bc76e0e8e7%2Fquick_order_forms_list.png?alt=media" alt="Manage Quick Order Pages: click Create new page"><figcaption><p>Manage Quick Order Pages: click Create new page</p></figcaption></figure>

<figure><img src="https://165668525-files.gitbook.io/~/files/v0/b/gitbook-x-prod.appspot.com/o/spaces%2F6BtZ1bmXof30clbYP14n%2Fuploads%2Fgit-blob-b51f2d452b8de30b6db318ad5292f1e390be5c1e%2Fquick_order_choose_template_modal.png?alt=media" alt="Choose a template window"><figcaption><p>Choose a template window</p></figcaption></figure>

```mermaid
flowchart LR
    TMP["Choose a Template\n(Scratch or Wholesale)"] -->|Continue| S1["Step 1\nChoose customer type"]
    S1 -->|Next| S2["Step 2\nSet up Quick Order visibility"]
    S2 -->|Next| S3["Step 3\nCustomize Quick Order page\n(Customizer Workspace)"]
    S3 -->|Save| PUB["Publish Window\nPage title & Page URL handle"]
```

### Navigating Setup (New Page Creation)

* **Progress Indicator**: The top bar shows your current step (e.g., `Step 1 of 3`), step title, and an active progress tracker.
* **Step-by-Step Flow**: During initial setup, complete the active step and click **Next** to move forward.
* **Review Previous Steps Anytime**: Click **Back** (or click any previously completed step in the top bar) to review or adjust settings. Your entries and selections are safely preserved.
* **Resume Forward Instantly**: When you return to an earlier step to make an edit, clicking **Next** brings you directly forward without having to re-enter any completed steps.
* **Automatic Error Guidance**: If a required field is missing (such as the internal `Name` in Step 1), the page automatically highlights the field and displays an error message so you can fill it in before proceeding.
* **Save Bar**: The **Save** button in the top bar becomes active once you reach Step 3 (Customize page).

***

## 2. Step 1: Choose Customer Type & Name

The first step establishes who can access the page and sets an internal name for your store records.

<figure><img src="https://165668525-files.gitbook.io/~/files/v0/b/gitbook-x-prod.appspot.com/o/spaces%2F6BtZ1bmXof30clbYP14n%2Fuploads%2Fgit-blob-b923f026883261f37a644c2420f7ac5b2c7eb346%2Fquick_order_step1_customer_type.png?alt=media" alt="Step 1: Choose customer type &#x26; Enter Name"><figcaption><p>Step 1: Choose customer type &#x26; Enter Name</p></figcaption></figure>

### 2.1 Customer Type ("Who are you creating this Quick Order page for?")

Select who this Quick Order page is designed for:

* **Default Customers**: Best for retail buyers, guest visitors, or tagged wholesale accounts using standard Shopify catalog pricing.
* **Company Customers**: Best for wholesale corporate clients managed through B2B Catalogs and negotiated pricing.
  * *Catalog Sources*: In Step 2, you can load catalogs assigned to a **B2B Market** (available across all Shopify plans) or assign specific **Company Locations** (requires Shopify Plus).
  * *App Subscription*: Configuring B2B catalog conditions requires an active **Enterprise Plan** subscription in the app.

### 2.2 General Information

* **Name**: Enter a clear internal identifier for your team (e.g., *Wholesale VIP Catalog*, *Hardware Replenishment Portal*). This name is strictly internal for administrative tracking and is never shown to customers.
* **Requirement**: This field is required. If left blank, clicking **Next** highlights the input box in red and displays `"Name is required"` so you can enter a name before proceeding.

<figure><img src="https://165668525-files.gitbook.io/~/files/v0/b/gitbook-x-prod.appspot.com/o/spaces%2F6BtZ1bmXof30clbYP14n%2Fuploads%2Fgit-blob-01e3390c38605113cc78adcbad50e4b60e5fb725%2Fquick_order_step1_validation_error.png?alt=media" alt="Step 1: Name is required message"><figcaption><p>Step 1: "Name is required" message</p></figcaption></figure>

Click **Next** to proceed to Step 2.

***

## 3. Step 2: Set Up Visibility & Product Scoping

Step 2 unifies customer access rules, customer exclusions, catalog product selection, and real-time order table preview.

<figure><img src="https://165668525-files.gitbook.io/~/files/v0/b/gitbook-x-prod.appspot.com/o/spaces%2F6BtZ1bmXof30clbYP14n%2Fuploads%2Fgit-blob-ef0ba4aabf21907266f232fde222677e084d06b7%2Fquick_order_step2_visibility.png?alt=media" alt="Step 2: Set up Quick Order visibility"><figcaption><p>Step 2: Set up Quick Order visibility</p></figcaption></figure>

### 3.1 Customer Access ("Who will see the page")

Choose which storefront visitors can access this Quick Order page:

* **All customers**: Open to all visitors, including guest shoppers.
* **All logged-in customers**: Requires visitors to sign into their customer account.
* **Specific customers**: Grant access only to designated customer accounts (search by customer name or email address).
* **Customers with specific tags**: Grant access to customers with wholesale or VIP tags (e.g., `wholesale`, `vip-tier-1`, `dealer`).
  * *Tag Display*: Tag selectors display up to **10 tags** inline. If more than 10 tags are selected, click `+N more` to expand the full list, or `Show less` to collapse it.

### 3.2 Customer Exclusions ("Exclude customers" — Default Customers Only)

For **Default Customers** pages, you can apply negative targeting rules:

* **Exclude by Customer Account**: Block specific accounts from viewing this page even if they meet general criteria.
* **Exclude by Customer Tags**: Prevent customers with specific tags (e.g., `retail-only`, `inactive`) from accessing the page.

{% hint style="info" %}
**B2B Company Pages**: Customer exclusion rules apply to **Default Customers only**. For Company Customers pages, customer targeting is managed natively via Shopify B2B Company Location assignments, so the exclusion card is automatically hidden.
{% endhint %}

### 3.3 Product Scope ("What products are displayed")

Choose which catalog items appear on your Quick Order table:

* **All products**: Display your store's entire active product catalog.
* **Specific products**: Hand-pick individual items from your catalog using the search picker.
* **Specific collections**: Display products from selected Shopify collections (e.g., *Bulk Hardware*, *Seasonal Clearance*).
* **Specific tags**: Automatically pull all products matching designated product tags.
* **B2B Catalogs (Company Customers)**: Load catalogs from a designated source:
  * **B2B Market**: Load catalogs assigned to a Shopify Market (available across all Shopify plans).
  * **Company Location**: Load per-location catalogs where products are combined across selected company locations (requires Shopify Plus). *(Requires an active Enterprise Plan subscription in the app).*

### 3.4 Product Exclusions (Default Customers Only)

Refine your catalog scope by filtering out specific products:

* **Exclude Specific Products**: Prevent selected items or restricted products from appearing.
* **Exclude Collections or Tags**: Suppress clearance categories or discontinued items.
* **Summary Card**: Excluded items are summarized in a compact preview card showing product images and titles, displaying up to 2 items inline with a `+N more` tooltip for additional items.

### 3.5 Table Sorting & Default Collection Order

Choose how products are ordered when buyers first open the page:

* **Title**: Alphabetical (`A–Z` or `Z–A`).
* **Price**: Numerical (`Low to High` or `High to Low`).
* **Date Added**: Chronological (`Newest to Oldest` or `Oldest to Newest`).
* **Best Selling**: Ranked by store sales volume.
* **Product Tag**: Alphabetical order by product tag.
* **Default Collection Order**: Preserves the exact manual sort order configured inside Shopify Admin for that collection.

{% hint style="warning" %}
**Collection Order Tip**: "Default Collection Order" is available **only when exactly one collection is selected**. If you select two or more collections, or filter by tags/products, the list automatically defaults to **Title A–Z** so buyers can easily locate items.
{% endhint %}

### 3.6 Real-Time Product Order Preview

Directly below your product settings, the **Product Order Preview** reflects your active scope:

* **5 Items per Page**: Displays an interactive 5-row preview table with page navigation.
* **Attribute Display**: Displays product thumbnail, title, lowest available price, and primary tag so you can quickly verify your catalog selection.
* **Variant SKUs**: Variant-level SKUs appear on your published storefront table, while this admin preview displays high-level product details.
* **Loading Indicator**: Displays skeleton rows and a progress bar while retrieving matching products from your Shopify catalog.

<figure><img src="https://165668525-files.gitbook.io/~/files/v0/b/gitbook-x-prod.appspot.com/o/spaces%2F6BtZ1bmXof30clbYP14n%2Fuploads%2Fgit-blob-7b7cc8d59152f5c302272b3e03bbf07424dd7bab%2Fquick_order_step2_product_preview.png?alt=media" alt="Step 2: Collection picker, Sort by, and Product Order Preview"><figcaption><p>Step 2: Collection picker, Sort by, and Product Order Preview</p></figcaption></figure>

Click **Next** to enter Step 3.

***

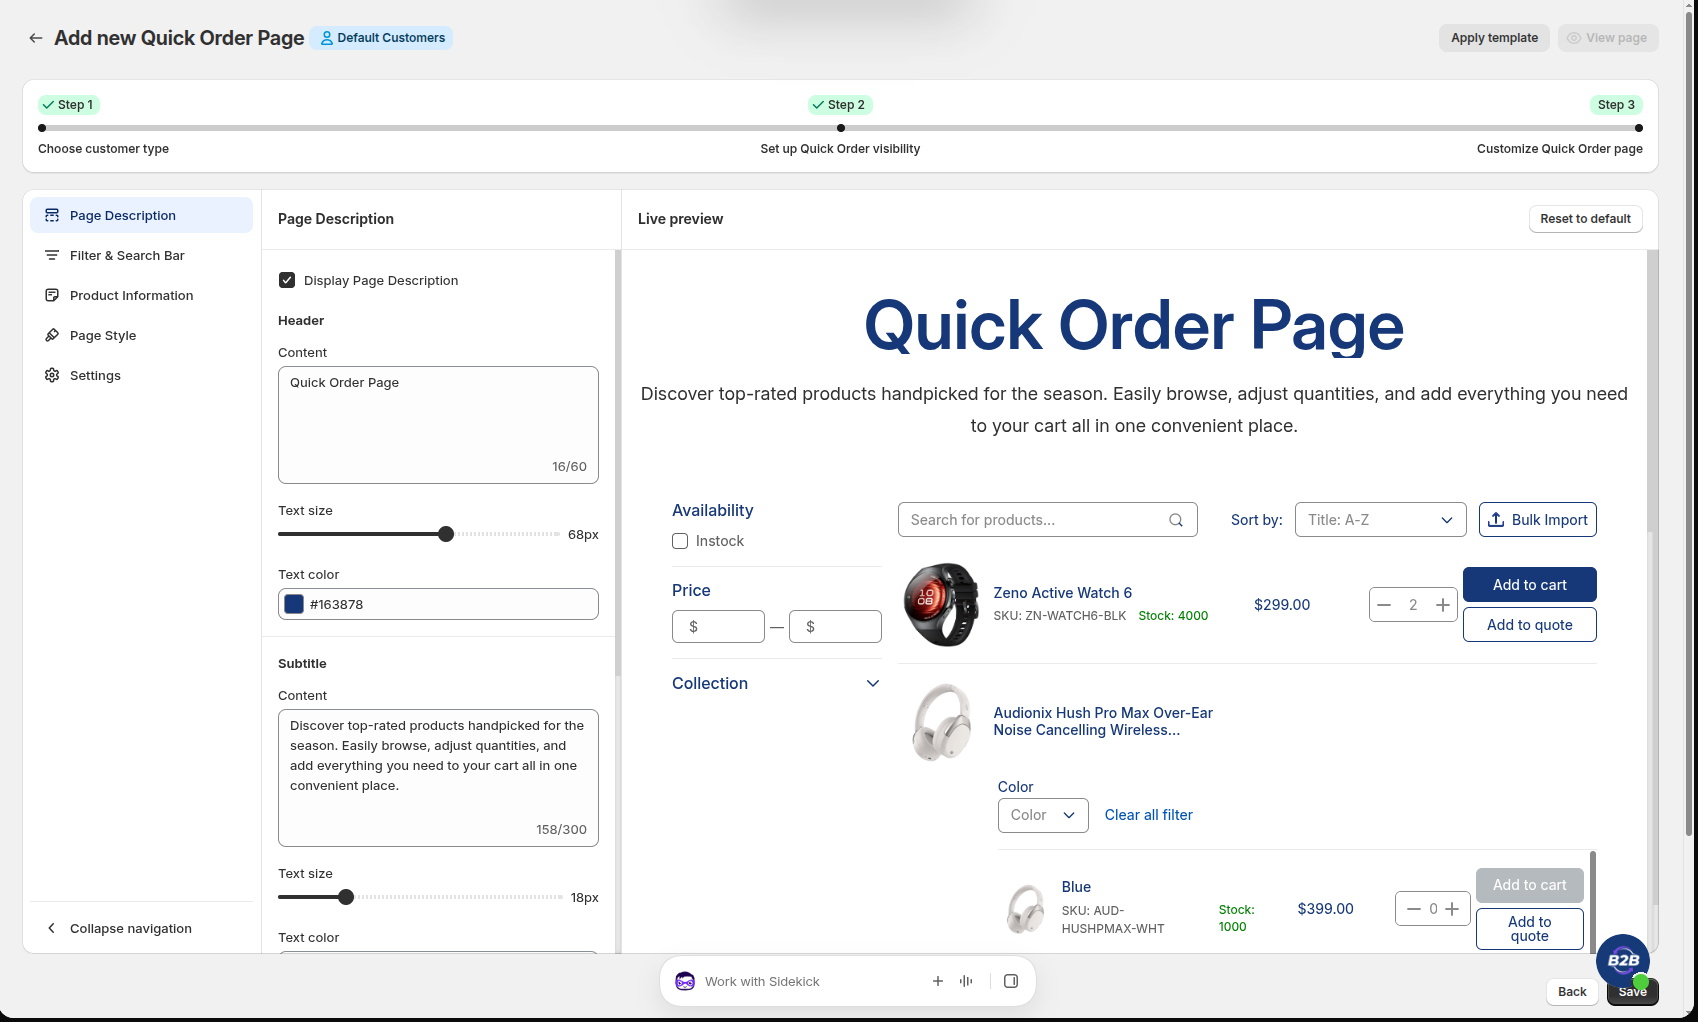
## 4. Step 3: Customize Storefront Design (The Customizer Workspace)

Step 3 opens the **Customizer Workspace** where you design table columns, search filters, header content, and brand styling while viewing a real-time storefront preview.

<figure><img src="https://165668525-files.gitbook.io/~/files/v0/b/gitbook-x-prod.appspot.com/o/spaces%2F6BtZ1bmXof30clbYP14n%2Fuploads%2Fgit-blob-776dcfdf78e4090b5dea592aad37873813797189%2Fquick_order_step3_customizer_overview.png?alt=media" alt="Step 3: Customize Quick Order page"><figcaption><p>Step 3: Customize Quick Order page</p></figcaption></figure>

The workspace has three columns:

* **Left – Sections**: Pick what you want to edit. Click **Collapse navigation** at the bottom if you want a wider editing area.
  * **Page Description**: Header title, subtitle, background, and custom links.
  * **Filter & Search Bar**: Search bar, sort, bulk import, and filters.
  * **Product Information**: Which product details appear as table columns.
  * **Page Style**: Corner radius, borders, and colors.
  * **Settings**: Variant display and Request for Quote integration.
* **Middle – Settings**: Adjust the options for the section you picked, such as text, sliders, color pickers, and toggles.
* **Right – Live preview**: See your page exactly as buyers will, including the header, search bar, filters, product table, and Add to Cart / Add to Quote buttons. It updates as you make changes and adapts to desktop, tablet, and mobile sizes.
  * **Reset to default**: Restores the layout and styling to the template defaults.

***

### 4.1 Section 1: Page Description

Configure introductory content and custom navigation links at the top of your Quick Order page:

* **Display Page Description**: Checkbox toggle to show or hide the header banner entirely.
* **Header Content**: Set the main storefront title (e.g., *Bulk Order Portal*). Includes a character counter enforcing a max of 60 characters.
* **Title Text Size**: Adjust the header font size from `20px` to `100px` to match your store theme (default `68px`).
* **Title Text Color**: Color picker with hex input.
* **Subtitle Content**: Introductory guide or ordering instructions (e.g., *"Select items, enter quantities, and add to cart in bulk."*). Max 300 characters.
* **Subtitle Text Size & Color**: Adjust font size (default `18px`) and text color.
* **Header background**: Set a solid background color or provide an Image URL for a custom banner (if added, the image renders on top of the color).
* **Custom links**: Add up to **4 custom links** (e.g., *Return to Catalog*, *Download PDF Price Sheet*, *Contact Support*). Each link supports a custom Label and destination URL.

***

### 4.2 Section 2: Filter & Search Bar

Help buyers locate products quickly across large catalogs:

* **Search bar**: Toggle instant search across product titles, SKUs, and barcodes.
* **Sort**: Enable or hide storefront sorting controls for buyers.
* **Bulk import**: Toggle the customer-facing CSV upload button in the header.
* **Product & Variant Metafields (Growth Plan+)**: Filter items by custom Shopify Product or Variant Metafields (e.g., *Brand*, *Material*, *Grade*).
* **Standard Facet Filters**: Enable sidebar or top-bar filters by **Availability (In-stock)**, **Price range**, and **Collections**.
* **Add new filter**: Add additional custom filter conditions.

***

### 4.3 Section 3: Product Information

Select which product details appear as table columns:

<figure><img src="https://165668525-files.gitbook.io/~/files/v0/b/gitbook-x-prod.appspot.com/o/spaces%2F6BtZ1bmXof30clbYP14n%2Fuploads%2Fgit-blob-9d7b065e1da6041527488418586ee8fd7b840b1b%2Fquick_order_step3_product_columns.png?alt=media" alt="Product Information settings"><figcaption><p>Product Information settings</p></figcaption></figure>

* **Standard Columns**: Checkbox toggles to display variant **SKUs**, categorized **Type**, **Vendor**, and warehouse **Inventory** stock level.
* **Discount badge**: Highlights promotional discount percentages or wholesale tier badges.
* **Product Metafields & Variant Metafields (Growth Plan+)**: Click **Manage** to select and display custom product specification columns directly on the bulk order table.

*(Note: Product unit price is a standard catalog element and is always displayed in the table).*

***

### 4.4 Section 4: Page Style

Match the Quick Order page to your store's branding:

* **General**:
  * **Corner radius**: Set card and button roundness (default `6px`).
  * **Border width**: Set table and container outline thickness (default `1px`).
* **Color scheme**:
  * **Page**: Set Background color, Border, Primary text color, and Secondary text color.
  * **Main product button** (Default label: *"Add to cart"*): Customize normal and hover state colors for Background, Text, and Border.
  * **Second product button** (Default label: *"Add to quote"*): Customize normal and hover state colors for Background, Text, and Border.
  * **Text links**: Set normal and hover colors for clickable links across the page.
  * **Input fields**: Set Background, Text and icon, and Border colors for search, price, quantity, sort, and filter fields.

***

### 4.5 Section 5: Settings

* **Quick Order Variant Display**:
  * **Show all variants in a list**: Every variant (size, color, pack) renders directly as an individual table row with its own quantity input. Recommended for fast, high-density bulk ordering.
  * **Show variants in a pop-up**: Displays one row per product with a button opening a variant picker window. Recommended for stores with massive catalogs and 50+ variants per item.
* **Integrations**:
  * **Integrated with Request for Quote**: Check this option to connect Quick Order with your RFQ rules. When active, products matching your Quote Logics display an **Add to Quote** button alongside or replacing Add to Cart.

***

## 5. Saving, Publishing & Updating Existing Pages

### 5.1 Save & Publish Your New Page

Once you have completed your configuration in Step 3:

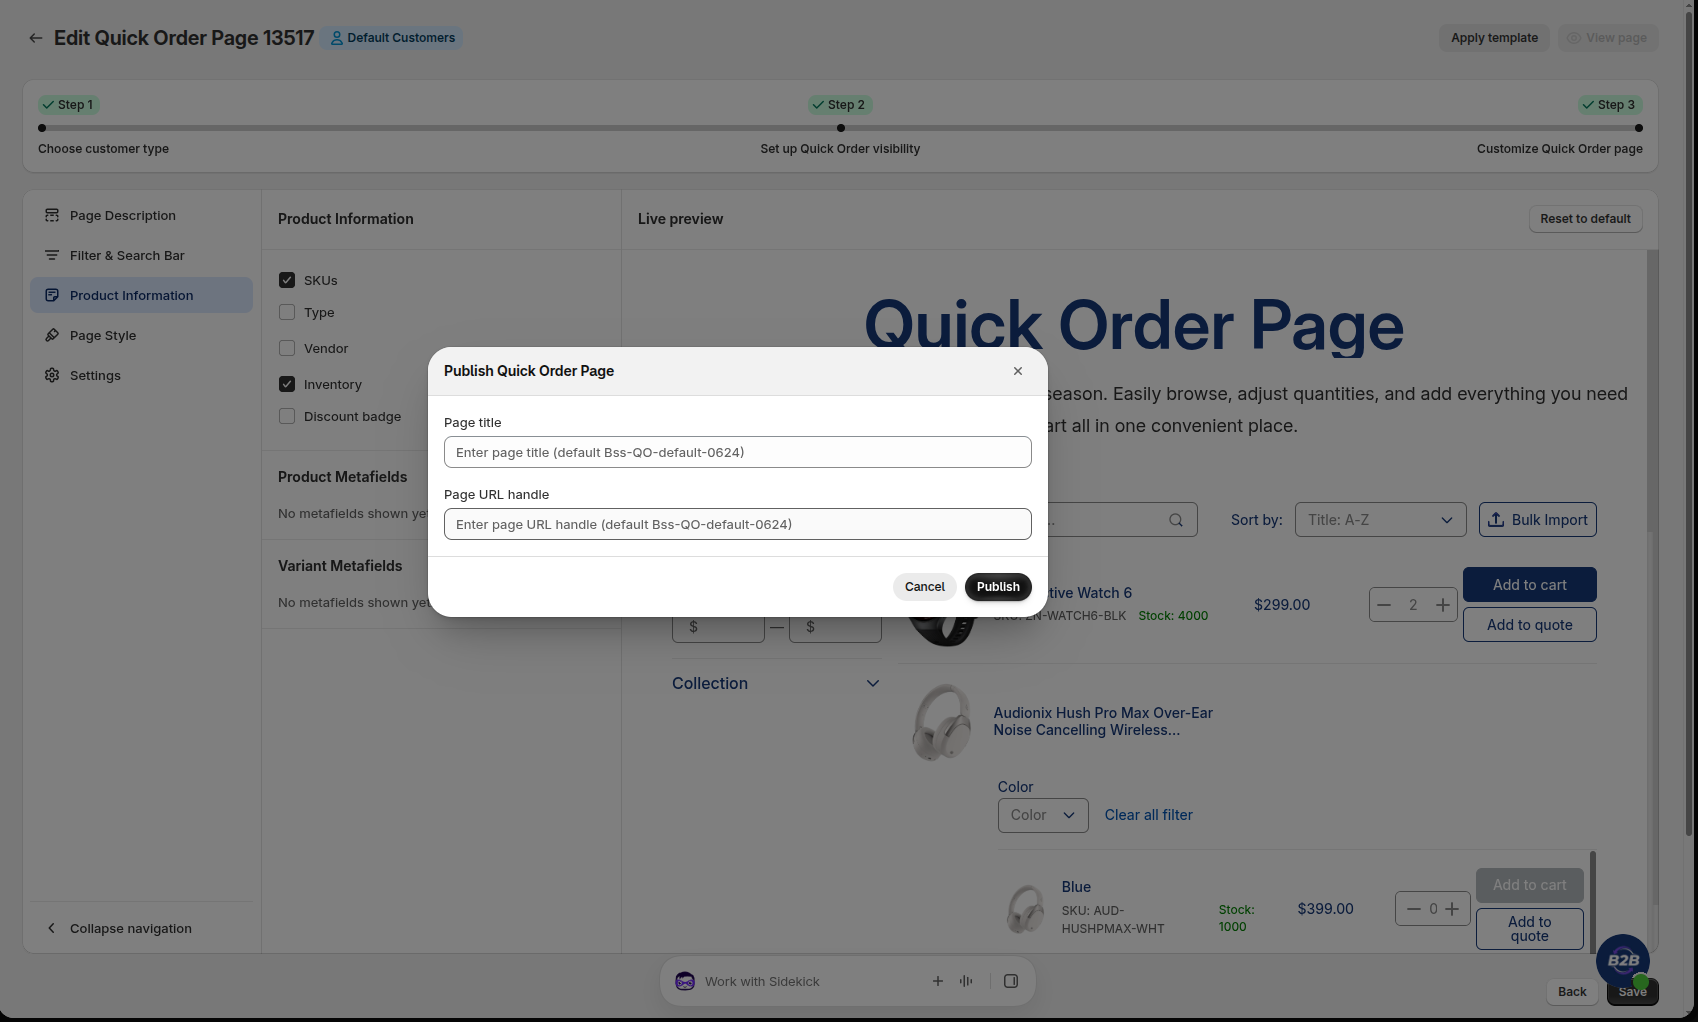
1. The **Save** button in the top bar becomes active.
2. Click **Save**. The app saves your configuration and displays the **Publish Quick Order Page** modal:
   * **Page title**: Enter the customer-facing page title shown in browser tabs (e.g., *Wholesale Quick Order*).
   * **Page URL handle**: Set the web address slug (e.g., `wholesale-quick-order`, accessible at `/pages/wholesale-quick-order`).
3. Click **Publish** (or click **Cancel** to save as draft). The app automatically creates the Shopify Page and links your theme template.

<figure><img src="https://165668525-files.gitbook.io/~/files/v0/b/gitbook-x-prod.appspot.com/o/spaces%2F6BtZ1bmXof30clbYP14n%2Fuploads%2Fgit-blob-2584033df927647af5b73e935830b4ce30526e0c%2Fquick_order_publish_modal.png?alt=media" alt="Publish Quick Order Page window"><figcaption><p>Publish Quick Order Page window</p></figcaption></figure>

***

### 5.2 Updating Existing Pages (Edit Mode)

When opening an already-published Quick Order page from your dashboard:

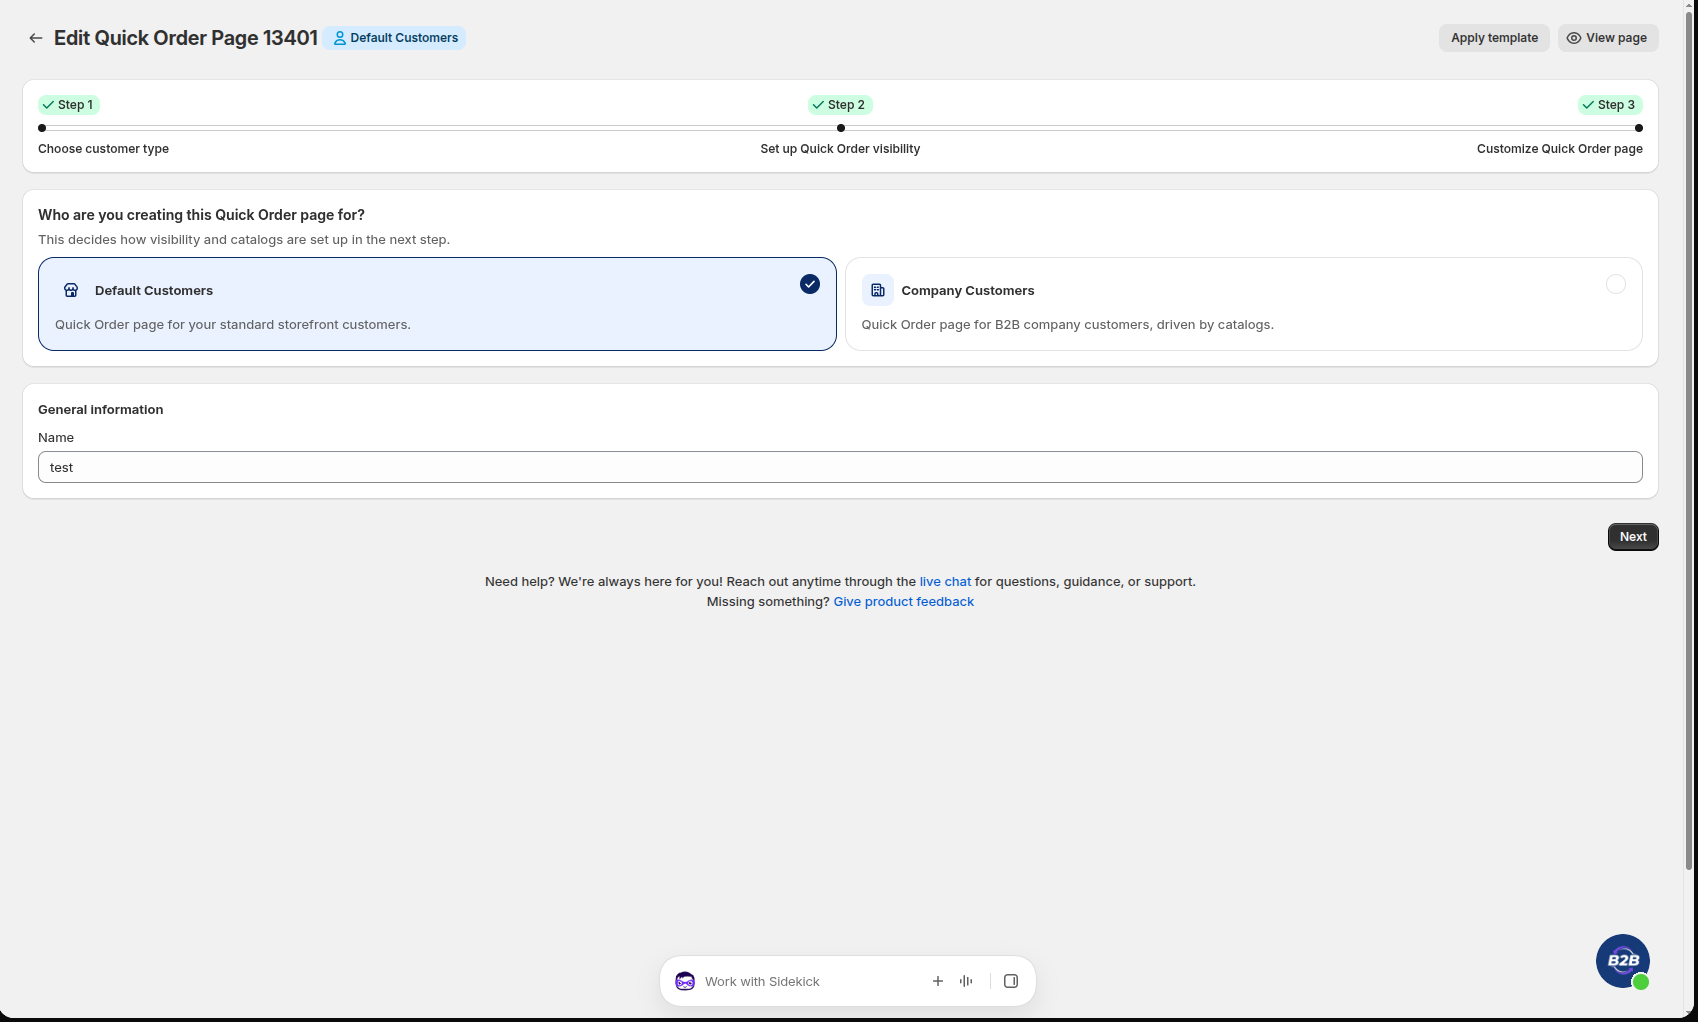
<figure><img src="https://165668525-files.gitbook.io/~/files/v0/b/gitbook-x-prod.appspot.com/o/spaces%2F6BtZ1bmXof30clbYP14n%2Fuploads%2Fgit-blob-00d647ada9725e3ef8c9d624cf54bb60755bf700%2Fquick_order_edit_mode.png?alt=media" alt="Edit mode: all steps unlocked"><figcaption><p>Edit mode: all steps unlocked</p></figcaption></figure>

* **Header Badges & Shortcuts**: The page header displays the page title, an **Info** badge, and a customer audience badge (**Default Customers** or **B2B Customers**). Click **View page** to open the live storefront page in a new tab, or click **Apply template** to open the template gallery.
* **Jump Directly to Any Step**: Unlike initial page creation, all 3 steps in the top stepper are unlocked. Click directly on **Step 1**, **Step 2**, or **Step 3** to update settings instantly.
* **Save Changes Anytime**: Making changes on any step immediately activates the top Shopify bar (`Unsaved changes`) with **Discard** and **Save** buttons—there is no need to navigate to Step 3 to save edits.
* **Discarding Edits**: Clicking **Discard** immediately rolls back unsaved changes to your last saved state.
* **Switching Customer Types (Default ↔ Company Customers)**: If you switch an existing page between Default and Company Customers, audience and catalog settings reset to defaults:
  * Switching from Default to Company removes customer/product exclusion rules and opens B2B catalog mapping.
  * Switching from Company to Default resets catalog bindings and reactivates exclusion settings.