> For the complete documentation index, see [llms.txt](https://docs-shpf.bsscommerce.com/b2b-wholesale-solution/llms.txt). Markdown versions of documentation pages are available by appending `.md` to page URLs; this page is available as [Markdown](https://docs-shpf.bsscommerce.com/b2b-wholesale-solution/customer-management/registration-forms/manage-approve-and-notify-your-wholesale-customers.md).
# Manage, Approve, and Notify Your Wholesale Customers
Review applications, approve or reject them one by one or in bulk, delete or restrict customers, and set up the registration emails.
Once your registration form is live, every submission lands in the **Applications** tab. Approving an application creates the customer in Shopify with the form's tags; rejecting keeps them out. This page covers reviewing, approving, deleting and emailing your wholesale applicants.
## 🗂️ Open and find applications
Go to **B2B customers › Registration Forms** and click the **Applications** tab. The list has four tabs: **Pending**, **Approved**, **Rejected** and **All**. When applications are waiting, **Pending** opens first; **All** shows every application.
Applications list
* **Search** by email, or filter by **Name**, **Status**, **Form**, **Phone**, **Address phone**, **Company**, **Address**, **Country**, **City**, **State**, **Zip** or **Created at** (for example *Last 7 days*, *Last 30 days* or a custom range).
* Use **More columns** to add columns and **Set as default** to keep your layout.
* Change **Rows per page** to 25, 50 or 100 at the bottom of the list (lasts for the current session).
* Click **Add customer manually** to create a wholesaler yourself.
* Open the **Export** and **Import** tools from **More actions › Import & export** (see [Import & Export Registration Data](/b2b-wholesale-solution/customer-management/registration-forms/import-and-export-registration-data.md)).
### Account statuses
| Status | What it means |
| -------------- | ---------------------------------------------------------------------------------------------------------------------------------------------------------------- |
| **Pending** | The form was submitted and is waiting for your decision. The customer has no wholesale access yet. |
| **Approved** | You accepted the application. The customer gets wholesale pricing and B2B features. |
| **Rejected** | You declined the application. You can still approve it later. |
| **Restricted** | The customer was approved before, but their Shopify account is disabled. The registration is kept; enabling the account in Shopify sets it back to **Approved**. |
| **Deleted** | The Shopify customer was deleted but the registration record stays in the app, read only. |
## ✅ Approve or reject applications
Reviewing one application
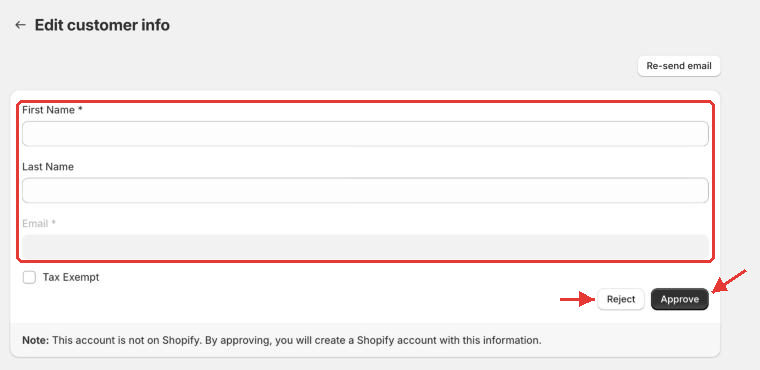
1. Click a row to open **Edit customer info** and check the answers. PDF, JPG, PNG and GIF files open in a preview when you click them. If you change an answer, save it before you approve.
2. Click **Approve** and confirm. The app creates the customer in Shopify with the form's details and tags, and the application moves to **Approved**. If the email already belongs to a Shopify customer, you are asked to confirm first, because approving overwrites that customer's information.
3. Or click **Reject** and confirm. Only **Pending** applications can be rejected. Rejecting only changes the status and doesn't touch any Shopify customer.
For an application that is already **Approved**, the page shows **Re-send email** at the top instead, so you can send the approval email again.
**What the customer gets:** a Shopify customer account. Phone becomes the customer's phone; company and address go to the default address; other answers go to the customer note (and, for version 2 forms, to customer metafields). The customer gets the form's tags, is tax exempt if **Tax Exempt** is ticked on the application, and receives Shopify's account invitation if they have no password yet.
{% hint style="info" %}
Approve is offered for **Pending** and **Rejected** applications, and Reject only for **Pending** ones. In the list, the approve and reject icons work for applications that don't have a Shopify customer yet; for the others, open the application.
{% endhint %}
### Approve or reject many at once
1. Tick the rows, or click **Select all X registrations that match this view** to include every page.
2. Click **Approve** or **Reject** in the selection bar and confirm. The job runs in the background, so you can leave the page.
3. A banner shows the progress (**Processing: X / Y registrations**). Click **Cancel job** to stop it; registrations already processed keep their result.
4. When it ends, click **Download failed list (.csv)** to see which registrations failed and why.
{% hint style="warning" %}
Bulk approve **skips** an application whose email already belongs to a Shopify customer and lists it as failed — approve it on its own so you can confirm the overwrite. A store runs one bulk job at a time, and applications submitted after a job starts are not included.
{% endhint %}
### Automatic approval
You choose how each form approves customers in its **Settings** step:
* **Manual approval after registration** – you review each application. Optionally tick **Auto approve if email contains** to approve matching emails (for example a partner's domain) automatically.
* **Auto-approval after registration** – customers are approved and created in Shopify the moment they submit.
See [Build a Powerful Wholesale Registration Form](/b2b-wholesale-solution/customer-management/registration-forms/build-a-powerful-wholesale-registration-form.md#step-3-settings) for every option.
## 🗑️ Delete, restrict or re-send
A registration in the app and the customer profile in Shopify are separate records. Click the delete icon on a row and choose:
* **Remove from app only (keep Shopify customer)** – the registration is deleted; the customer stays in Shopify but loses the tags this form assigned.
* **Delete Shopify customer only** – the profile is deleted in Shopify; the registration stays with status **Deleted** and becomes read only. To let the same email register again, remove the registration from the app too.
* **Delete from app and Shopify** – the Shopify customer is deleted first, then the registration.
For several selected rows use **Delete customers on our app server**, **Delete customers on Shopify** or **Delete customers on both**. Deleting is permanent.
{% hint style="warning" %}
Shopify keeps customers who have orders, a pending GDPR erasure request, a current or past subscription, or an undelivered scheduled gift card. You will see **Unable to delete wholesaler** — click **Go to Shopify Admin** to disable the account or request data erasure instead. In bulk, each customer is handled separately, and a customer Shopify keeps also stays in the app.
{% endhint %}
To block a customer without deleting, choose **Disable account in Shopify** from the same menu; the registration shows as **Restricted**. **Enable account in Shopify** reverses it.
To resend an email, open the application and click **Re-send email**. It resends the under-review email for Pending applications, and the approval or account activation email for approved ones.
## 📧 Email templates
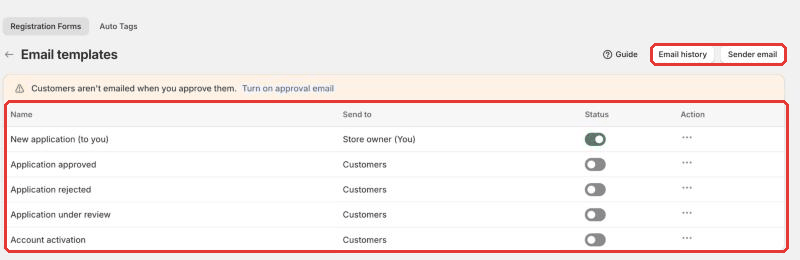
Registration Forms sends up to five emails: **New application (to you)** goes to you, and **Application approved**, **Application rejected**, **Application under review** and **Account activation** go to customers.
Go to **B2B customers › Registration Forms › Email templates**. The list shows each email, who it is sent to and its status.
Email templates list
1. **Turn emails on or off** with the **Status** switch on each row; the change is saved right away. **New application (to you)** needs at least one recipient before you can turn it on.
2. If you see **Customers aren't emailed when you approve them** above the list, click **Turn on approval email**.
3. Click an email to open **Edit email**: change the **Email subject** (up to 200 characters), attach files (up to 10 MB in total), and edit the **Title**, **Content**, **Button content** and **Button color**. **Insert variables** adds placeholders that are filled in when the email is sent. You can show or hide the app header, store name and app footer. To write your own HTML (for a logo, colors or fonts), click **Switch to HTML editor**.
4. In **New application (to you)**, type each address in **Send to** and press Enter (the first address gets the email, the others receive a blind copy). Under **Actions in email**, choose **View customer**, or **Approve/reject customer** to decide straight from the email. Those links expire after the **Link expiration** you pick, from 1 hour to 7 days. Approve/reject buttons only show for manually approved registrations.
5. **Send test email** sends the email as it is on screen to one address. **Revert to default template** brings back the original text. Click **Save** in the save bar.
6. **Turn on notifications in the form:** open the form, go to its **Settings** step, tick **Email notification for approved/declined customers** and save the form. This is what makes approving or rejecting in **Applications** email the customer.
**Which emails go out?** Each email is sent only if its template is enabled. Every submission sends you **New application (to you)**; manual-approval forms send the customer **Application under review**; with auto-approval, **Application approved** goes out at submission. When you approve or reject in **Applications**, **Application approved** and **Application rejected** also need the form's **Email notification for approved/declined customers** ticked. If **Account activation** is off or can't be sent, Shopify's own activation email is sent instead.
### Sender email
Emails are sent from the sender email you set in the app's **Settings**. Click **Sender email** at the top of **Email templates** to open **Sender email customization** (the same shortcut appears on the Net Terms notifications page). Without a sender email, the app's default address (`no-reply@email-bsscommerce.com`) is used.
{% hint style="warning" %}
Public addresses such as **Gmail** or **Outlook** can't be verified for sending, so your emails may still go out from `no-reply@email-bsscommerce.com`. For reliable delivery, use an address on your own domain.
{% endhint %}
{% hint style="info" %}
**Applicants who already have a Shopify customer record.** If someone registers with an email that already exists in your Shopify customers and the registration is auto-approved, both notifications are still sent: you get the **New application** email and the customer gets the **Application approved** email, alongside Shopify's usual account invite. Someone who is already an approved wholesaler and submits again does not trigger duplicate notifications.
{% endhint %}
Check what was actually sent in [Email History](/b2b-wholesale-solution/customer-management/registration-forms/email-history.md).
## 🏷️ Use tags for better organization
When customers are approved, the form's tags (for example "Wholesale", "VIP", "Distributor") are added to their Shopify profiles. Tags let you segment customers for pricing rules, or target B2B rules in other modules such as Custom Pricing or Volume Pricing.
## 💡 Tips
* Combine the approval status and tags to automate pricing or visibility rules.
* Always test your registration and email flow once before going live.
* Customers approved by this app log in on your store's normal customer login — there is no separate wholesale login. On an auto-approval form you can send customers straight to it after registering by choosing **To login page** under **After registration**.
{% hint style="info" %}
Customers who already exist in your Shopify admin are not imported into the Applications list automatically. To bring customers in bulk, use [Import](/b2b-wholesale-solution/customer-management/registration-forms/import-and-export-registration-data.md).
{% endhint %}
{% hint style="info" %}
If you need further assistance, please feel free to reach us at [**support@bss-b2b.solutions**](mailto:support@bss-b2b.solutions) or [**Live Chat**](https://go.crisp.chat/chat/embed/?website_id=9f64b5a9-1a02-4190-93b8-8ef56b19f740).
{% endhint %}