> For the complete documentation index, see [llms.txt](https://docs-shpf.bsscommerce.com/b2b-wholesale-solution/llms.txt). Markdown versions of documentation pages are available by appending `.md` to page URLs; this page is available as [Markdown](https://docs-shpf.bsscommerce.com/b2b-wholesale-solution/customer-management/registration-forms/set-up-a-multi-step-registration-form.md).

# Set Up a Multi-Step Registration Form

This feature exclusively works with Shopify's New Customer Accounts login.

Want a smoother, more professional experience for your wholesale customers? The **Multi-step form** breaks your registration process into up to **10 steps**—so collecting business info feels easier and more trustworthy. The form runs **inside Shopify customer accounts**: customers log in first (with a one-time code), so the form has no email or password fields and uses the logged-in account's email.

{% hint style="info" %}
The multi-step form is only available on stores using Shopify's **New Customer Accounts**. If your store still uses classic (legacy) accounts, use the standard [single-page form](/b2b-wholesale-solution/customer-management/registration-forms/build-a-powerful-wholesale-registration-form.md) instead.
{% endhint %}

<figure><img src="https://1478990334-files.gitbook.io/~/files/v0/b/gitbook-x-prod.appspot.com/o/spaces%2FGolQYRPH9iUGYatlTXwl%2Fuploads%2FmIxojhO4YzXXbwp3HMn9%2Fimage.png?alt=media&amp;token=87da9e55-1be3-4a26-a83f-d4fe86fda635" alt="A multi-step registration form on the customer account page"><figcaption><p>A multi-step registration form on the customer account page</p></figcaption></figure>

## 🚀 How to create your multi-step form

1. Go to **B2B customers › Registration Forms** and make sure the module switch is **on**.
2. On the **Forms** tab, click **Create form**.
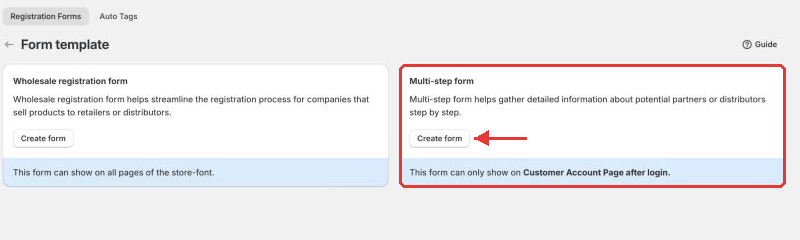
3. On the **Multi-step form** card, click **Create form**.

<figure><img src="https://1478990334-files.gitbook.io/~/files/v0/b/gitbook-x-prod.appspot.com/o/spaces%2FGolQYRPH9iUGYatlTXwl%2Fuploads%2Fgit-blob-7392784e3670721a7b9217a213c2fc6347468d3c%2Fcms-rf-multistep-01.png?alt=media" alt="Choose the multi-step form template"><figcaption><p>Choose the multi-step form template</p></figcaption></figure>

The editor has four steps: **Basics → Form editor → Settings → Publish**.

### Step 1: Basics

| Field         | Options                           | What it does                                                                                                       |
| ------------- | --------------------------------- | ------------------------------------------------------------------------------------------------------------------ |
| **Form name** | Text, up to 200 characters        | Name of the form.                                                                                                  |
| **Form ID**   | Read only, with a **Copy** button | Shows "Generated after saving form" until you first save. You will paste this ID into the customer account editor. |
| **Status**    | Enable / Disable                  | Disabled forms are not applied to your storefront.                                                                 |

### Step 2: Form editor

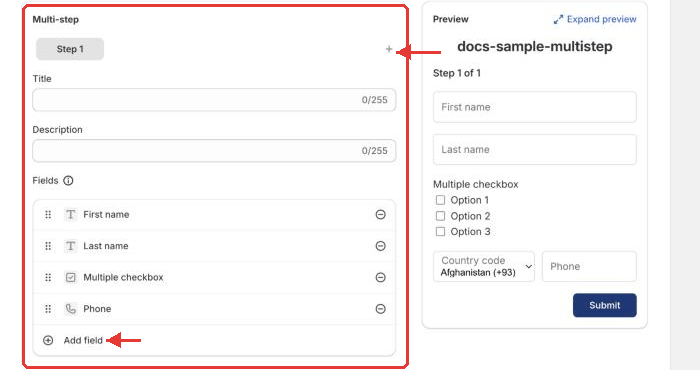
<figure><img src="https://1478990334-files.gitbook.io/~/files/v0/b/gitbook-x-prod.appspot.com/o/spaces%2FGolQYRPH9iUGYatlTXwl%2Fuploads%2Fgit-blob-e48c135c0d07aee6b43f4e667b59b1f30db8c521%2Fcms-rf-multistep-02.png?alt=media" alt="Organizing fields into steps"><figcaption><p>Organizing fields into steps</p></figcaption></figure>

* Use **Add step** (the **+**) to add up to 10 steps. Give each step a **title** and **description** (up to 255 characters each). Use **Move left**, **Move right** and **Remove** to reorder or delete a step.
* Add fields to each step with **Add field**: First name, Last name, Address, Address phone, Apartment, City, Company, Country (with optional State), Phone, Zip code, tax ID fields, **Subscribe to our newsletter**, and custom fields (Dropdown selection(s), Multiple checkbox, Radio options, Text field, Text area, Heading, Number, Date field, File upload).
* Each system field can be used **once across the whole form**. Use the expand icon on the preview to see the complete form.
* **Privacy policy mandatory:** turn on **Enable privacy mandatory step** to add a consent checkbox. It is added to the **last step** by default.
* Use the **Preview** panel to see how the form looks as customers move through each step. **Form history** lets you restore an earlier saved version.

### Step 3: Settings

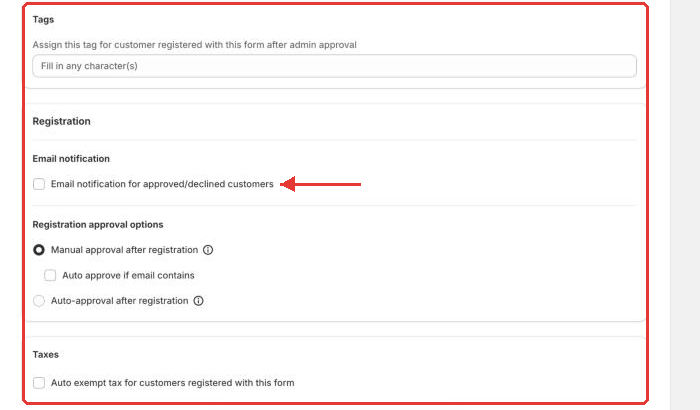
<figure><img src="https://1478990334-files.gitbook.io/~/files/v0/b/gitbook-x-prod.appspot.com/o/spaces%2FGolQYRPH9iUGYatlTXwl%2Fuploads%2Fgit-blob-6d4f98f4338a3c49a1fcab1734520827ee14760f%2Fcms-rf-multistep-03.png?alt=media" alt="Multi-step Settings step"><figcaption><p>Multi-step Settings step</p></figcaption></figure>

| Field                                                                       | Options          | What it does                                                                                                                                                                                                                                          |
| --------------------------------------------------------------------------- | ---------------- | ----------------------------------------------------------------------------------------------------------------------------------------------------------------------------------------------------------------------------------------------------- |
| **Tags**                                                                    | One or more tags | Assigned to customers from this form when they are approved.                                                                                                                                                                                          |
| **Email notification** – Email notification for approved/declined customers | Checkbox         | Emails the customer when you approve or reject in **Applications**. Also enable the matching [email templates](/b2b-wholesale-solution/customer-management/registration-forms/manage-approve-and-notify-your-wholesale-customers.md#email-templates). |
| **Registration approval options** – Manual approval after registration      | Radio            | Submissions wait as **Pending**. Optionally tick **Auto approve if email contains** and enter text to approve matching emails (case-sensitive).                                                                                                       |
| **Registration approval options** – Auto-approval after registration        | Radio            | Approves the customer at once.                                                                                                                                                                                                                        |
| **Taxes** – Auto exempt tax for customers registered with this form         | Checkbox         | Marks customers from this form as tax exempt.                                                                                                                                                                                                         |

A multi-step form has **no password field** at all.

### Step 4: Publish

Click **Save**, then on the **Publish** step:

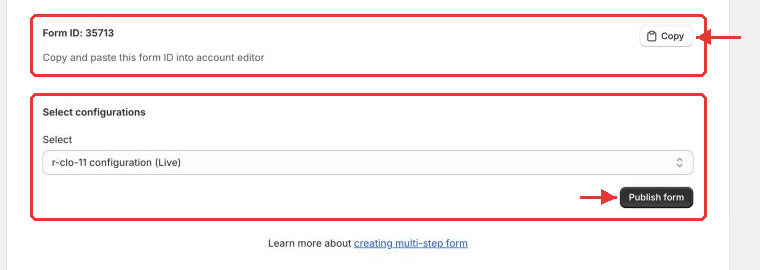
1. Click **Copy** next to the **Form ID**.
2. Under **Select configurations**, pick the customer account configuration (the live one is marked **Live**).
3. Click **Publish form**. Shopify's checkout and accounts editor opens.
4. In the editor, add the app's **Registration form page** and paste the Form ID into its **Form ID** setting, then **Save**.
5. To let customers see and update their details later, also add the **Wholesaler information** block to the customer account **Profile** page.

<figure><img src="https://1478990334-files.gitbook.io/~/files/v0/b/gitbook-x-prod.appspot.com/o/spaces%2FGolQYRPH9iUGYatlTXwl%2Fuploads%2Fgit-blob-99794b020ab107a4ce0d72a36feae5db83e343db%2Fcms-rf-multistep-04.png?alt=media" alt="Publish a multi-step form in customer accounts"><figcaption><p>Publish a multi-step form in customer accounts</p></figcaption></figure>

Once published, customers register through your **multi-step form**, and you receive their submissions in the **Applications** tab. With auto-approval the customer is approved at once, otherwise the application waits as **Pending**. After submitting, the customer returns to their account **Profile** page.

Here is how the form looks on the storefront:

{% embed url="<https://drive.google.com/file/d/1hf-RjUTS0rFWt3ALUUXb7U7sAuL_v7y-/view?usp=sharing>" %}

{% embed url="<https://drive.google.com/file/d/1p0L2hkmMbrBTo7Rj0tkxeBJ66h-S11Ok/view?usp=drive_link>" %}

{% hint style="info" %}
**Remember:** customers must log in with a 6-digit one-time code before they can fill in the registration form.
{% endhint %}

## ✅ Before you go live

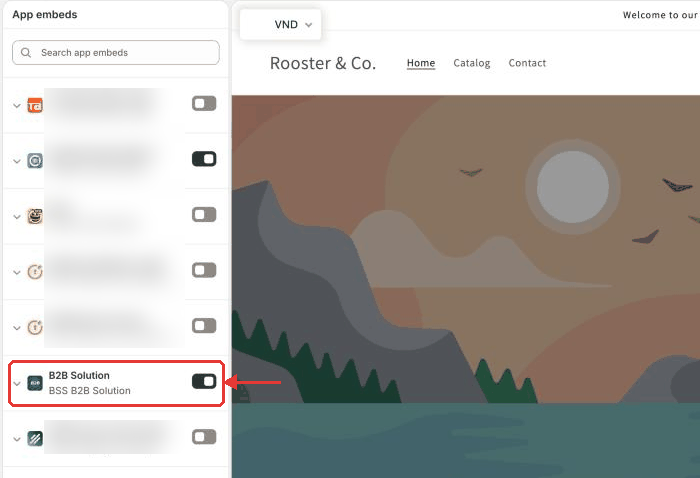
* The **app embed block** must be **enabled in your Shopify theme**. See [Publish Your Wholesale Registration Form to Your Storefront](/b2b-wholesale-solution/customer-management/registration-forms/publish-your-wholesale-registration-form-to-your-storefront.md).

<figure><img src="https://1478990334-files.gitbook.io/~/files/v0/b/gitbook-x-prod.appspot.com/o/spaces%2FGolQYRPH9iUGYatlTXwl%2Fuploads%2Fgit-blob-ba830a2515f8787f7cd8fcdf06211f68efd06f07%2Fcms-embed-03.png?alt=media" alt="Turn on the B2B Solution app embed in your theme"><figcaption><p>Turn on the B2B Solution app embed in your theme</p></figcaption></figure>

* To open the live form from the admin, use **View form on store** in the row **Actions** menu of the **Forms** tab. It opens the form page in your customer account site once the page is set up.
* Multi-step forms can be [translated](/b2b-wholesale-solution/customer-management/registration-forms/translate-your-registration-form-for-cross-border-wholesalers.md), and the **Step** texts have their own group in the translation editor.
* Multi-step forms are **not** included in customer import (see [Import & Export Registration Data](/b2b-wholesale-solution/customer-management/registration-forms/import-and-export-registration-data.md)).

{% hint style="info" %}
If you need further assistance, please feel free to reach us at [**support@bss-b2b.solutions**](mailto:support@bss-b2b.solutions) or [**Live Chat**](https://go.crisp.chat/chat/embed/?website_id=9f64b5a9-1a02-4190-93b8-8ef56b19f740).
{% endhint %}